Smart Thermostat X
By Tado°
starter kit to control your Tado heating wired version

This page has been visited ... times
After presenting the sumptuous Tado° X thermostatic faucet, as well as the most successful Tado app, Now let’s get to the heart of the system. Today, I’m going to introduce you to the two Tado° controllers: the Wireless Smart Thermostat X and the Smart Thermostat X. These two controllers feature the Border Router Thread protocol.
So, which starter kit should you choose for your installation ?
Haade.fr is a participant in the Amazon Services LLC Associates Program, an affiliate advertising program designed to provide a means to earn fees by linking to Amazon.com and affiliated sites.
Before getting into the nitty-gritty, if you want to check your boiler’s compatibility, Tado has created a tool available.(https://tado-rwknz.involve.me/productcompatibility-update-fa01a73abe00-ab546a5c19ba-copy-88cf43650695){: target=”_blank”} online. Let’s start with the Smart Thermostat X, the wired boiler controller using the com/No/Nc port.

The tado° smart starter X is a starter kit that comes with:

Let’s start by unpacking the thermostat. Inside the box, you’ll find clean and well-designed packaging. Well, no one cares about that, but I wanted to point it out. As with all tado° products, you’ll find a piece of cardboard under the lid with the Matter QR code and the authentication code. Be sure to keep it safe; it could be useful if the system crashes. But that shouldn’t happen.
Inside the box, you’ll find:
You will note that there are no paper instructions, just a short general instruction (not shown in the photo), but to get the full instructions: go to the Tado application: Settings > Rooms and Devices then click on the product concerned and go to Installation Instructions.

The tado° controller works with 3 AAA batteries which are supplied, it also acts as a temperature and humidity sensor, you will find on the back side the Matter integration QR code as well as the electrical connection picos.

The stickers provided are there to number the wires. By removing the small screw, you’ll find the space to connect your boiler’s communication cables.
First, there’s COM/NC/NO/P1/P2. All of these connections are available, but most conventional boilers operate with two wires: one for the COM port and the other for NO (normally open). P1 and P2 are provided for 3-wire boilers.
For maximum connection information, see the full list of connections, And especially since the instructions aren’t included, go to the Tado app: Settings > Rooms and Devices then click on the relevant product and go to Installation Instructions.
Then there’s a 2-wire connection for the Opentherm protocol, If your boiler works with it, you will need to connect it. See your boiler’s instructions, but you can also find this information in the installation instructions.

This is the bridge that integrates the Thread connection protocol. It’s not necessarily necessary if you already have another Matter/Thread bridge/dongle, as these are open protocols with multi-brand communication. But if you don’t have a gateway, you absolutely must connect this bridge. It has one major drawback: it connects to a power outlet, so it will monopolize one of your sockets. Otherwise, the integration is perfect.
It comes with two UK/EU adapters.

On the front panel, there’s only one WPS button. This will make your life easier when connecting to your home Wi-Fi network. It also serves as a factory reset button.
When you plug it in, the light at the bottom, corresponding to the power connection, lights up. The light just above flashes, indicating that the bridge is ready to pair with the Matter environment. Once connected to the Tado° app, three lights will appear to let you know the bridge is in place.

All tado products can be reset, which is useful if you encounter integration issues with the app.
Go to this page to find all the information.
| Dimensions | Wired Smart Thermostat X: 104 x 104 x 18 mm Bridge X: 60 x 60 x 31 mm |
| Power Supply | Smart Thermostat X batteries: 3 AAA (LR03) 4.5 V, DC 1200 mAh. Bridge X: 230 V operating voltage, power consumption 0.7 W. |
| Connection | The Smart Thermostat X connects to the internet with the Bridge X. You can plug the Bridge X into an outlet to connect to your Wi-Fi router. To install tado°, your mobile device must have at least iOS 16.4 or Android 9.0. |
| Finish | Wired Smart Thermostat X: PC, ABS. Bridge X: PC. |
| Interface | Wired Smart Thermostat X: 49 x 30mm LCD display, LED backlight; input: 3x push. Bridge X: 4 x LEDs. |
| Warranty | We offer a 10-year warranty on all tado° X products. |

The wireless starter kit has similar features to the Smart Thermostat X, but the approach is different.
In this pack, the Thread controller is bundled with the boiler controller (for boiler systems that communicate wirelessly between the thermostat and the boiler), but it also allows wired communication with the boiler, like the Smart Thermostat X. It differs from its counterpart thanks to the remote thermostatic sensor.

Inside the pack we find the controller and a remote thermostatic probe.

The wireless bridge module pack is relatively well made. Inside the pack, you’ll find a controller with a detachable power cable, stickers, a set of screws and wall plugs, and a set of three cables to connect P1/P2 and P3.
On the top face two buttons are available, one concerns the wps function and the other allows you to activate the boiler or the boost function manually.

To access the connectors, simply unclip the case. Under the case, you’ll find the Matter pairing QR code and numerous LED indicators.

For the LEDs, starting from the left, you have:

For the connection section, starting from the left, you have:
The temperature sensor supplied with the wireless kit is similar to the tado digital thermostat. However, since it only acts as a temperature sensor, you won’t find any boiler connections or OpenTherm connections.

It comes with:

In the Tado° environment (via the app), the temperature sensor or even the thermostat** are important.
When you integrate them in the same room as one or more tado X thermostatic valves, it will no longer be the temperature of the valve that will be measured (as it can be inaccurate due to the proximity of the radiators), but the temperature measured by the sensor will be used.
And those without the need for automation.

There are several ways to integrate Tado° thermostats, sensors, and valves into Home Assistant, notably using a Thread key external to the Tado bridge. However, if you want to keep the boost function without having to create an automation in HA and in particular the link between the temperature of the sensors or thermostats with the thermostatic valves I suggest you carry out the entire installation in the Tado application and then share the products with home assistant thanks to Matter.
To do this:
Go to the tado app then:

Then the Matter interface appears on your smartphone:
Then simply follow the steps.

Devices are now shared with Home Assistant
Below is an animated GIF of the thermostatic valve integration.

Below is an animated GIF showing the integration of the thermostat included in the Smart Thermostat X kit.
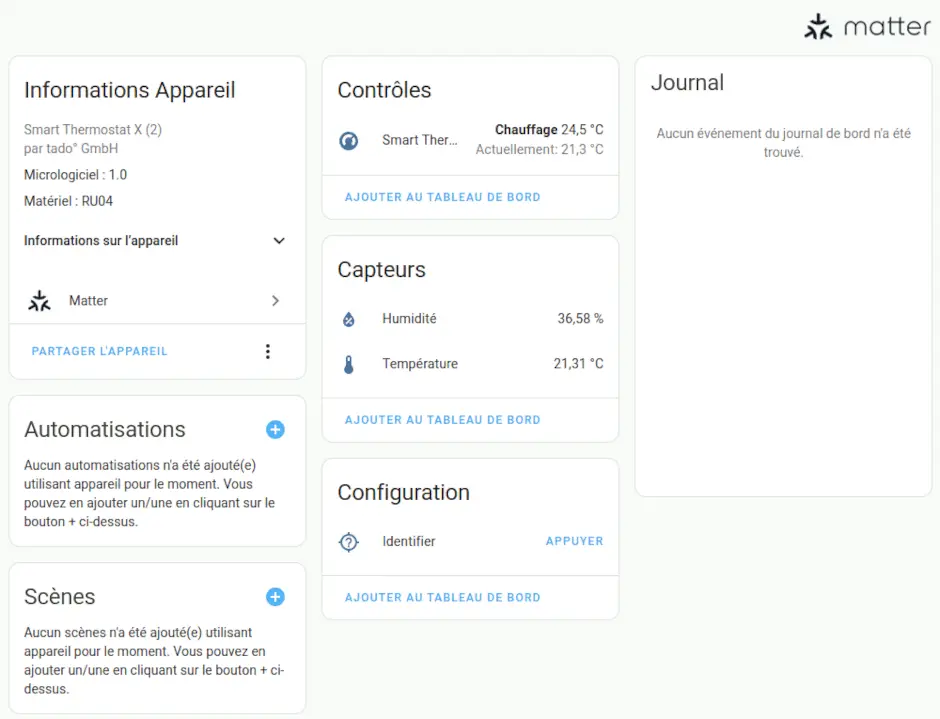
That’s it, in no time we’ve shared the Tado° devices in Home Assistant, thanks Matter.
When I ordered the products to test the environment, I’ll admit I was confused about which starter kit to choose. This is because of the terms used by Tado.
So what Tado° says isn’t wrong, because they’re talking about the connection between the original thermostat and the boiler. But you need to know that 😉
By asking yourself the right questions, you can easily choose between the Smart Thermostat X starter kit or the Wireless Smart Thermostat X.
As you can see, both kits can control your boiler using the ports. Com/No In most cases I recommend you get the Wireless Smart Thermostat X Starter Kit.
Haade.fr is a participant in the Amazon Services LLC Associates Program, an affiliate advertising program designed to provide a means to earn fees by linking to Amazon.com and affiliated sites.
The prices are high, but Tado° has the merit of currently manufacturing the best products on the market, easy to install and use.
Here’s a comparison to help you see things more clearly between the two starter kits offered by Tado°. It’s important to remember that the wireless kit offers the same functions as the Smart Thermostat Kit, but it also allows wireless connection to compatible boilers. If your controller is in an unheated room, as is often the case, then I recommend the wireless kit, provided you can plug it into the mains. In other cases, I recommend the Smart Thermostat X.

I’ve been looking for a compact and silent multi-channel controller to drive my 24V DC irrigation system for quite some time. After testing Zigbee solutions like the Sonoff SWV or...

Following my Reolink Trackmix Poe camera test, I mentioned having found my ideal camera with a Dahua model. Well, here we are! Let me introduce the Dahua SD1A404DB-GNY, a compact...
After testing the SLZB-MR4U multi-radio dongle, I’m turning back to the SMLIGHT brand for a radically different yet equally exciting product: the SMHUB NANO MG24.
Copyright © 2026 Haade 🎉 by Nicoxygen

Comments