Zoneminder, home assistant and Machinelearning

This page has been visited ... times

Sommary
- Prerequis:
- The installation environment:
- 1 - Preparation of Zoneminder for Home assistant and Machinelearning ML
- Zoneminder password protection
- Setup for Home Assistant
- 2 - Machinelearning configuration (ZMEVENTNOTIFICATION)
- 3 - Integration of Zoneminder in Home Assistant
- What is a state in Zoneminder:
- 4 - How Modes work in Zoneminder:
- How Zones work in Zoneminder
- How filters work in Zoneminder
- In Conclusion
Dlandon this year released a Docker image complete with Zoneminder and Machinelearning, integration into home assistant is complete. This is why this article absolutely had to see the light of day. For less than a year, installation under docker has been greatly simplified. In addition, machinelearning is very complete thanks to object detection, facial detection, facial recognition, plate recognition, etc ….
Prerequis:
- Home assistant core or HAOS installed and functional
- Traditional computer with HDD or NAS type
- Docker installed and functional on the computer
- Know how to use the docker environment to install and configure Zoneminder
The installation environment:
Zoneminder will be installed on a NAS running Openmediavault with docker. This choice is almost essential, on the one hand the CPU / GPU processor is relatively powerful, moreover the storage of videos can become very invasive. I do not recommend installing Zoneminder on a Raspberry Pi, not powerful enough for zm and active Machinelearning.
when the home assistant OS, it is installed on a Raspberry pi since can, before I used the home-assistant core which was running in a container on the NAS.
below we find the docker command that we find in the documentation of the github repository .
docker run -d --name="Zoneminder" \
--net="bridge" \
--privileged="false" \
--shm-size="8G" \
-p 8443:443/tcp \
-p 9000:9000/tcp \
-e TZ="America/New_York" \
-e PUID="99" \
-e PGID="100" \
-e MULTI_PORT_START="0" \
-e MULTI_PORT_END="0" \
-v "/mnt/Zoneminder":"/config":rw \
-v "/mnt/Zoneminder/data":"/var/cache/zoneminder":rw \
dlandon/zoneminder.machine.learning
Example of custom configurations “the one I use” for Openmediavault, you have to think about customizing the TZ timezone as well as any mounting volume. You can install ZM unsecured with the port -p 8080: 80 , however I strongly advise to install in ssl, letsencrypt is part of the container. Bye!
docker run -d --name="Zoneminder" \
--net="bridge" \
--privileged="false" \
--shm-size="8G" \
-p 8443:443/tcp \
-p 9000:9000/tcp \
-e TZ="Europe/Paris" \
-e PUID="1000" \
-e PGID="100" \
-e MULTI_PORT_START="0" \
-e MULTI_PORT_END="0" \
-v "/sharedfolder/Appdata/Zoneminder":"/config":rw \
-v "/sharedfolder/Télésurveillance/Zoneminder":"/var/cache/zoneminder":rw \
dlandon/zoneminder.machine.learning
After launching the image, the installation is done quickly thanks to dlandon’s work on the image. Previously with the old image of Zoneminder you had to wait 20 to 40 minutes, the ES and ML part took a lot of time. Now Zoneminder and The ZMEventnotification package install in less than 5 minutes .
PS: If you want to use a installation under docker-compose you will find the code here.
1 - Preparation of Zoneminder for Home assistant and Machinelearning ML
Zoneminder password protection
Change the default user Admin in options »> users and set a password
Then in Options »> Systems
Check the boxes like the image below and enter a Hashsecret code for more security
- OPT-USE_AUTH: password authentication
- AUTH_HASH_SECRET: Additional code ( you can generate a code here )
- AUTH_HASH_LOGINS: take into account double security
- OPT_USE_API: Activate the Zoneminder API
- OPT_USE_LEGACI_API_AUTH: enable API authentication
- OPT_USE_EVENTNOTIFICATION: Consideration of machine learning

Setup for Home Assistant
Then you have to create a user dedicated to Homeassistant with an opening to the Zoneminder API:
Options »> Users » Add users

2 - Machinelearning configuration (ZMEVENTNOTIFICATION)
To begin with, all the documentation is available at this address https://zmeventnotification.readthedocs.io/
For the learning machine we have 3 files to customize for these 3 files there is also a duplicate example. So these are the secret.ini files which contain all the passwords and objectconfig.ini contains each setting for each camera. Basically we indicate what we want Zmeventnotification to analyze according to each camera.
secrets.ini should look like this (in my config I don’t use the ML API, OpenAlpr, Escontrol, Mqtt and Pushover)
# your secrets file
[secrets]

# fid can have the following values:
# a particular <frameid>, alarm or snapshot
# starting ZM 1.35, you can also specify
# objdetect_mp4, objdetect_gif or objdetect_image
# this needs create_animation enabled in objectconfig.ini and associated flags
ZMES_PICTURE_URL=https://example.com/zm/index.php?view=image&eid=EVENTID&fid=objdetect&width=600 # TO CUSTOMIZE

ZM_USER=haos # TO CUSTOMIZE
ZM_PASSWORD=JaImEin3t3rdesMoTs # TO CUSTOMIZE
ES_ADMIN_INTERFACE_PASSWORD=i3i3gr0tUiY # TO CUSTOMIZE

ZM_PORTAL=https://example.com/zm # TO CUSTOMIZE
ZM_API_PORTAL=https://example.com/zm/api # TO CUSTOMIZE

ES_CERT_FILE=/etc/apache2/ssl/zoneminder.crt
ES_KEY_FILE=/etc/apache2/ssl/zoneminder.key

ML_USER=your_mlapi_user
ML_PASSWORD=your_mlapi_password
PLATEREC_ALPR_KEY=your_platerec_api_key # that i use
OPENALPR_ALPR_KEY=your_openalpr_api_key

ESCONTROL_INTERFACE_PASSWORD=yourescontrolpassword

MQTT_USERNAME=your_mqtt_username
MQTT_PASSWORD=your_mqtt_password

PUSHOVER_APP_TOKEN=your_pushover_app_token
PUSHOVER_USER_KEY=your_pushover_user_key
Next to objectconfig.ini which should look like the code below. With the new version of ZMeventnotification, the configuration of monitors has been greatly simplified
Click here if you want to read the official doc.
For these settings, do not hesitate to write to me but in the first place it is a question of modifying the [monitor-x] indeed we do not put the name of its camera but if this is in the first position, we will call it monitor-1 and so on, below is an example of garage monitoring.
[monitor-1]
# mon Door
model_sequence=alpr,object
object_detection_pattern=(person|car|motorbike)

[monitor-2]
#doorbell
model_sequence=face,object
object_detection_pattern=(person)

[ml]
use_sequence= yes # Important for the support of the new system
in order to be able to use the capture of images by person you must create a folder if it does not exist in … named known_faces and integrate inside a subfolder named nicolas then integrate photos of you which will be named 1.webp, 2.webp, etc. architecture direct link https://zmeventnotification.readthedocs.io/en/latest/guides/hooks.html?highlight=known#known-faces-images
[
Once all the images have been inserted or as soon as you add a new image, you will have to generate the train_face, so let’s go into the docker zoneminder:
docker exec -it zoneminder /bin/bashOnce all the images are integrated in the folder or in case of adding images, run the following command to generate the trainface:
sudo -u www-data /var/lib/zmeventnotification/bin/zm_train_faces.pyrestart the service
sudo service zoneminder restartand voila if everything went well Zmeventnotification should be functional.
3 - Integration of Zoneminder in Home Assistant
zmeventnotification known-faces
the lines of codes below are to be entered in the configuration.yaml of home-assistant to know all the parameters consult this official page: Intéegrate Zoneminder and Home assistant.

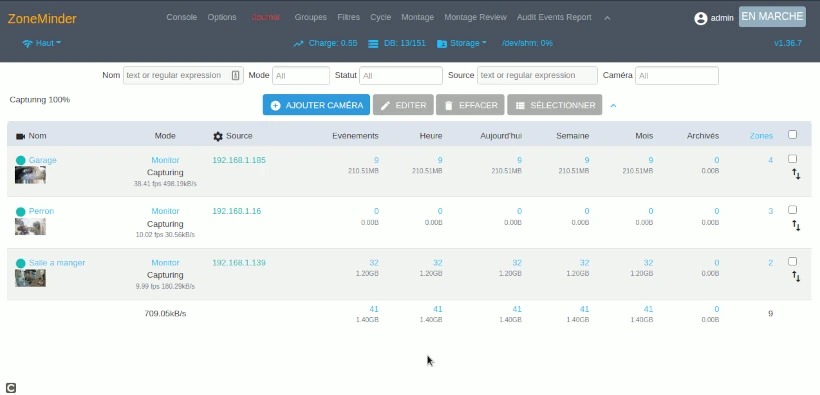
full zoneminder interface in home assistant
In addition to this integration into home-assistant Zoneminder allows a service called zoneminder.set_run_state. Allows to Change the state of Zoneminder.
What is a state in Zoneminder:
A state in Zoneminder allows you to manage the Camera Modes as we see fit, just by switching to this state.
By default there are 3 states in Zm:
- Stopped: unactive all cameras
- Reboot: reboot all cameras
- Default default setting
For Home Assistant I created two new states, HOME is a state when I am at home, and AWAY when I am away, these states are used as part of an automation by alarm management
- HOME: when I am at home the indoor cameras are in Monitor mode and the exteriors in Modect.
- AWAY: when I am away they all switch to Modect.
IMPORTANT ! the camera modes must be configured before recording a new state, see the Gif below.
ADVANTAGE: Compared to the Zm binary-sensor which allows you to switch from one mode to another in HA, the change of state is very practical when you want to choose another mode, when you are full of cameras and above all simplifies automations in HA call a service without needing to call each camera or create a binary_sensor Home or Away group in HA group.yaml.
4 - How Modes work in Zoneminder:
- None: Monitor disabled. No flow visualized nor any event generated.
- Nodect: This is a special mode designed to work with external triggers. In Nodect, no motion detection takes place but the events are recorded on external triggers
- Monitor: The monitor is only available for live streaming. Without image or event analysis.
- Mocord: The monitor records continuously, with any movement evidenced in these events.
- Modect: The monitor analyzes images and generates events. The video records in motion for a specified time.
- Record: The monitor records continuously. Events of fixed duration are generated regardless of movement, much like conventional time-lapse video recording. No motion detection takes place in this mode.
How Zones work in Zoneminder
An article is dedicated to zones and presets, click here!
How filters work in Zoneminder
An article is dedicated to filters, click here!
In Conclusion
Finally, Zoneminder may not have the most beautiful interface, but thanks to its free and stable nature it is certainly the best camera management tool around. Once you have mastered the various aspects, it then becomes practical, intuitive and essential from a security point of view, integration into Home assistant is a significant plus.

Articles that might interest you

Kincony B8M ESP32 8-channel MOSFET controller test for irrigation
I’ve been looking for a compact and silent multi-channel controller to drive my 24V DC irrigation system for quite some time. After testing Zigbee solutions like the Sonoff SWV or...

Dahua SD1A404DB-GNY the full option PTZ camera in Frigate
Following my Reolink Trackmix Poe camera test, I mentioned having found my ideal camera with a Dahua model. Well, here we are! Let me introduce the Dahua SD1A404DB-GNY, a compact...

OpenWrt tutorials, AP bridge mode, guest access, and network protection
I wanted to write a summary tutorial because I encountered several problems while setting up my secondary router, which runs OpenWrt. I finally found all the information in the official...
Comments