Hikvision DS-KV8x13 Doorphone Review

This page has been visited ... times
Sommary
As part of a installation for access control in a town hall and already automated with Home Assistant, I bought a complete Hikvision kit because the price is attractive and I already know that I could control everything in Home Assistant.
- Hikvision intercom DS-KV8X13
- two DS-KH6350 monitors
- a PoE switch
- RFID badges
On Aliexpress for the modest price of €386 delivered, After a brief and efficient installation, I will give you my opinion on this kit.
Presentation
Photo of the kit supplied and delivered from Poland in less than a week; I’m completely satisfied with this order.


Doorphone DS-KV8X13
I chose the flush-mount kit that comes with the doorphone, a flush-mounting box, and a protective cap. This kit comes with:
- instructions
- rewritable 13.56 MHz RFID tags
- a drilling guide
- wrenches and screwdrivers
- screws and wall plugs.

The doorphone can be disassembled using an Allen key and a screw located under the bottom. You then have access to the doorbell display for easy replacement of the identification labels.
On the back, there are two removable connectors that allow you to connect electric locks (2), pulse switches, or any other control mechanisms via dry contact. On the right, there is also a POE-compatible RJ45 port.
Finally, on the side, there is a micro SD card compartment for recording motion captures and videos locally, like on an IP camera.

Finally, since I own a Doorbird D202, I took a screenshot to show you the differences between the two. They’re not the same product at all, but one thing is certain: the video quality of the Hikvision DS-KV8X13 is significantly superior to the Doorbird.
Note that the price of the Hikvision ds-KV8213 is a quarter of the price of a Doorbird D202. You can find it on AliExpress for around €120. While integration with Home Assistant isn’t as straightforward, it’s not insurmountable.


The 720P video quality is far superior to the older D202 intercoms manufactured by Doorbird.
DS-KH6350 Screen
Let’s unbox the 7” screen included with the kit. I chose the DS-KH6350. I have no complaints. The packaging is neat, and the screen comes with:
- a wall mount
- instructions
- screws
- connection cables.

Regarding connectivity, it can be powered by a standard RJ45 POE port or a 12V power supply. This screen can also be used to connect one or two electric locks for remote control.
The screen can also be connected to a Wi-Fi network.

Good to know: Monitors can operate independently of the door entry system, and vice versa. For example, you could purchase a monitor and an IP camera to control access to a front door.

Nice quality screen, too bad it doesn’t run Android so you can display Home Assistant or any other apps.
If you want a Hikvision Android compatible screen, there’s a 10” one the DS-KH9510, seul défaut sa faible résolution de 1024x600
The negative point of the ds-kh6350 screens, apart from a proprietary integration, is the resolution which is capped at 1024x600px, I would have liked a resolution of 1280x800px, but on this type of product it remains a detail.
Connection method

There are two methods to integrate the Hikvision intercom DS-KV8X13. The first method is to connect a DS-KH6350 screen to the network as well as the doorphone. Then, simply follow the initial installation steps on the screen. Nothing complicated.
The second method, if you ordered a standalone doorphone so you can easily control it from your smartphone or via the Home Assistant app, will require you to use the official Hik-Connect app to install it on your network.
Below, I’ll explain the installation method using the Hik-Connect app in more detail.
With screen (easiest control)
Since I didn’t have an RJ45 socket near my office, I didn’t perform this procedure for the video tutorial. However, there are many videos circulating on the web showing how to do this. Below I have attached an installation video, it is not in French but it will do the trick.

With the Hikvision app (Wi-Fi)
First step: create a Hik-connect account and download the smartphone app.
Hik-connect app
Hik-connect is the app that will allow you to access your door entry system via the web; it’s a cloud service with a Chinese server. You can either choose to use the web app https://hik-connect.com or via your smartphone by installing the official application.
You don’t have to use this app if you integrate the DS-KV8X13 intercom into Home Assistant.
However, if you use the screenless door entry system, you’ll need to use this app to configure the activation.

More informations on Qrcode
This QRcode allows you to Download the Hik-connect app directly for Android or Apple you have the choice between scanning this QRcode from your smartphone or clicking directly on the link below.
Hik-connect applications for Smartphone
Once set up, the initial step is to connect your intercom to your private Wi-Fi network. Even if it’s connected via POE during this process, Hik-Connect favors the Wi-Fi network.
During the product registration steps, I recommend clicking on manually add a device. Then, simply enter the serial number, which you can find directly on the back of the intercom.
Finally, power on the intercom, wait a few seconds for an alarm to sound. Then, to activate access point mode, simply press and hold the top doorbell for 10 seconds and click on access point enabled.

In the following steps, you will need to enter:
- Your Wi-Fi network password and click Next
- A username and password for the device

The network will configure itself automatically, and there you have it, the doorman is connected to the home network and fully configurable, but not unfortunately directly in the hik-connect application.

Furthermore, the hik-connect application doesn’t allow you to know or find the IP address of the doorman. To do this, you’ll unfortunately have to search directly in your box’s settings, for example. It’s quite easy to identify.

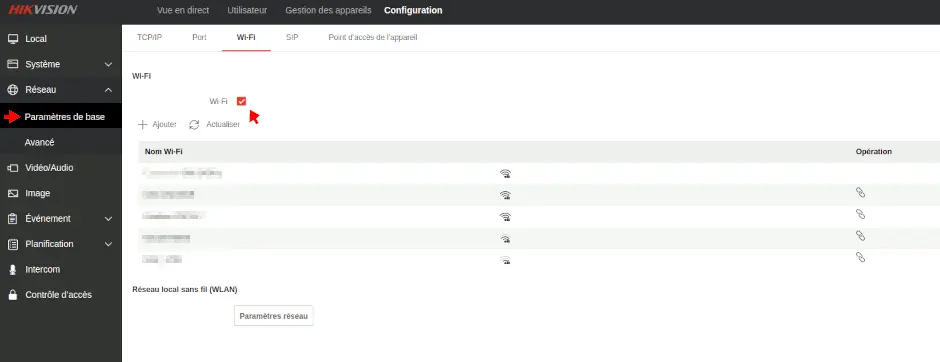
Once you have access to the terminal’s hardware configuration, you can change the network connection method by switching from Wi-Fi to RJ45. To do this, follow these steps:
- Connect to the server (IP address)
- Go to Network > Basic Settings
- Enable DHCP under TCP/IP and save (this will force and generate a dynamic IP address)
- Then disable DHCP and save (if you want a static IP address)
- Go to the Wi-Fi tab and uncheck the box, then save
- Restart the gateway (System > Maintenance tab).
I’ve illustrated the procedure in an animated GIF below.
For the rest of the details of the configuration watch the video that I specially made for the occasion, it is not the best but it is more detailed.
Control via external services
The Hikvision DS-KV8x13 intercom and the DS-KH6350 monitor are fully controllable via Home Assistant. For camera control, I chose to integrate it into the free Frigate video controller. You’ll see this later in this tutorial. PergolaFabio offers an alternative for connecting video control directly to Home Assistant without using an external NVR.
To follow this integration, you will need:
- Home Assistant OS
- Frigate
- Mosquitto MQTT
- Install HACS
- Install Frigate and advanced-card-camera via HACS
- Install the Hikvision add-on via PergolaFabio
And below is the final result of the integration

Home Assistant Integration
First of all, you’ll need to install the mqtt (mosquitto) add-on module. If you’ve never done so before, you can easily find a suitable tutorial online.
Find the full installation method on the module’s GitHub.
Then you need to integrate the device’s functions into home-assistant using the pergolaFabio add-on, I let you click on this link to follow the installation steps of the repository and add-on.

Once installed, you’ll need to modify the configuration
To do this, it’s easy. Go to the module’s configuration tab:
In the Doorbells column, you must:
- Set the entity name
- The doorbell’s IP address DS-KV8X13
- The doorbell’s username and password
You can configure multiple entities see the module’s instructions
in the mqtt: column
- the IP address of the MQTT server
- the port (1883 by default)
- SSL activation, if applicable
- the mqtt username
- the mqtt password
Finally, start the module
If everything went well, you will have access to both modules and all the necessary functions


PS: For the screen, you can activate additional functions by activating scenes in the module.
You can now use the door entry system or the screen to:
- reject or hang up calls
- mute/unmute the audio output
- activate the dry contact outputs
- reboot
- answer the call
- view the call status
- etc.

Frigate Integration
To control the camera stream, I use the Frigate NVR . I won’t go over its features. You’ll find all the information on the official website. It’s important to remember that this NVR is free and can be used in an external Docker, making it potentially compatible with all open-source assistants on the market, such as Openhab, Jeedom, etc.
Frigate is fully compatible and can be integrated into Home Assistant.
I use the Frigate link module, available in the HACS directory. This will bring up all the cameras configured in Frigate in the Home Assistant instance.
Below is the code for integrating the camera into Frigate.
One of the features of the Hikvision camera that makes it a bit more complex to configure is its Isapi function. Fortunately this function has been supported by the go2rtc manager since 2022 and can therefore be configured in frigate.
go2rtc:
  streams:
    interphone:
      - "ffmpeg:rtsp://admin:aaa@192.168.x.x/Streaming/Channels/101/#async#input=rtsp/udp#video=copy#audio=aac#audio=opus#hardware=cuda"
      - isapi://admin:aaa@192.168.x.x:80/
cameras:
  interphone:
    enabled: true
    audio:
      enabled: true
      min_volume: 100
    ffmpeg:
      output_args:
        record: preset-record-generic-audio-copy
      inputs:
      - path: rtsp://127.0.0.1:8554/interphone?video&audio
        input_args: preset-rtsp-restream
        roles:
        - record
        - audio
        - detect
https://github.com/blakeblackshear/frigate/discussions/12501
Once this code is integrated, the camera will go back to frigate
Advanced Camera Custom Card
Thanks to the advanced camera card available in the HACS directory, you can easily integrate the Hikvision door entry camera DS-KV8X13 into Home Assistant.
- GO2RTC compatible
- Frigate compatible
- ISAPI compatible

Below is the code used to display the camera in Lovelace with the custom advanced camera card
type: custom:advanced-camera-card
cameras:
  - camera_entity: camera.intercom
menu:
  style: outside
  position: bottom
  buttons:
    microphone:
      enabled: true
      type: toggle
    screenshot:
      enabled: false
    download:
      enabled: false
    fullscreen:
      enabled: false
    snapshots:
      enabled: false
    timeline:
      enabled: false
    media_player:
      enabled: false
    clips:
      enabled: false
    live:
      enabled: false
    cameras:
      enabled: false
    iris:
      enabled: false
    camera_ui:
      enabled: false
live:
  microphone:
    always_connected: true
    mute_after_microphone_mute_seconds: 90
  auto_mute: []
  auto_unmute: []
  controls:
    builtin: true
    title:
      mode: none
  layout:
    fit: fill
elements:
  - type: custom:advanced-camera-card-menu-icon
    icon: mdi:volume-high
    tap_action:
      - action: custom:advanced-camera-card-action
        advanced_camera_card_action: unmute
  - type: custom:advanced-camera-card-menu-icon
    icon: mdi:volume-off
    tap_action:
      - action: custom:advanced-camera-card-action
        advanced_camera_card_action: mute
  - type: custom:advanced-camera-card-menu-icon
    icon: mdi:phone
    tap_action:
      - action: call-service
        service: button.press
        data:
          entity_id: button.interphone_answer_call
      - action: call-service
        service: button.press
        data:
          entity_id: button.interphone_hangup_call
      - action: custom:advanced-camera-card-action
        advanced_camera_card_action: sleep
        duration:
          ms: 200
      - action: custom:advanced-camera-card-action
        advanced_camera_card_action: unmute
      - action: custom:advanced-camera-card-action
        advanced_camera_card_action: microphone_unmute
  - type: custom:advanced-camera-card-menu-icon
    icon: mdi:phone-hangup
    tap_action:
      - action: custom:advanced-camera-card-action
        advanced_camera_card_action: microphone_disconnect
      - action: custom:advanced-camera-card-action
        advanced_camera_card_action: mute
      - action: call-service
        service: text.set_value
        data:
          entity_id: text.interphone_isapi_request
          value: PUT /ISAPI/System/TwoWayAudio/channels/1/close
  - type: custom:advanced-camera-card-menu-icon
    icon: mdi:door-open
    tap_action:
      - action: call-service
        service: switch.turn_on
        data:
          entity_id: switch.interphone_door_relay_0
dimensions:
  aspect_ratio_mode: static
  aspect_ratio: "4:3"
status_bar:
  style: none
profiles: []
cameras_global:
  dimensions:
    layout:
      fit: fill
https://github.com/pergolafabio/Hikvision-Addons/
Conclusion
Hikvision is a very well-made Chinese manufacturer, including the Hikvision intercom DS-KV8X13. In addition to its low price compared to the competition, it offers many undeniable advantages in home automation. It’s not perfect, but it will do the job perfectly in most cases. I highly recommend these products.

Articles that might interest you
Dahua SD1A404DB-GNY the full option PTZ camera in Frigate
Following my Reolink Trackmix Poe camera test, I mentioned having found my ideal camera with a Dahua model. Well, here we are! Let me introduce the Dahua SD1A404DB-GNY, a compact...

SMLIGHT SMHUB NANO Review: The fully independent Linux smart home hub
After testing the SLZB-MR4U multi-radio dongle, I’m turning back to the SMLIGHT brand for a radically different yet equally exciting product: the SMHUB NANO MG24.

OpenWrt tutorials, AP bridge mode, guest access, and network protection
I wanted to write a summary tutorial because I encountered several problems while setting up my secondary router, which runs OpenWrt. I finally found all the information in the official...
Comments