Automatizes any edf meter for 20€ in 5 minutes

This page has been visited ... times
Sommary
There are many ways to retrieve the teleinfo from the Edf meter, one of the latest modules is the Lixee but it has the disadvantage of only being compatible with some counters. I’m going to show you how to bring up the teleinfo in home assistant for 20€ without wifi esp32/8266 modules, with a micro usb module manufactured by Charles Hallard the latest is the micro teleinfo v3.0, named also µteleinfo.
Prerequisites
- homeassistant OS
- a micro Teleinfo v3.0 by Charles Hallard usb
- communication wire
- an EDF meter
I was able to make this installation easily for a friend who is going to automate his home by mounting a raspberry pi 4 in a din rail box directly in the electrical panel near the EDF meter.
this installation is compatible with all EDF meters on the market.
Advantage of this facility:
- Easy to put in place
- the price
Inconvenience:
- proximity between the home assistant module and the meter
- monopolizes a usb port
- absorbs a little power from the home automation box about 3w
Let’s talk a bit about the installation: this tutorial allows you to send information via the mqtt service. You will need to install the official mosquitto add-on module, then I will show you how to install the teleinfo2mqtt add-on module developed by fmartinou this one is functional with all usb TICs on the market, so with the microphone teleinfo V3 by Charles Hallard.
Top Chrono installation in (5 minutes)
To carry out this installation, don’t hesitate to use the my.homeassistant.io links below.
Mosquito MQTT module
1 Installs MQTT add-on, Mosquitto
[settings > Add-ons > Add-ons stores] or click on the link below
2 Then create a user account in home assistant for mosquitto, in general I put in usernames mqtt easier to recognize 😏
3 Go back to Mosquitto configuration
and add these lines in the logins tab as in the image capture below.

- username: "user login"
  password: "user password"
4 Start Mosquitto
take a look at the info log to see how well the module is working.
Téléinfo2mqtt module
teleinfo2mqtt module github link
The advantage of this module and its simplicity, accompanied by careful documentation. It also has the advantage of being stable.
1 Installs the teleinfo2mqtt add-on
start by adding fmartinou’s external repository https://github.com/fmartinou/hassio-addons, or click directly on the link below:

2 Once the installation is done, the module will have created a device named teleinfo2mqtt which also allows you to control updates.

3 Connect Charles Hallard’s micro teleinfo v3.0 key to the raspberry and restart homeassistant at the top right
4 Parameter teleinfo2mqtt
Connect the teleinfo module to your home automation box restart homeassistant
- [go to settings > system > hardware] and click on all hardware
- retrieves the exact link of the key (see the capture below)

Then go back to téléinfo2mqtt and parameter téléinfo2mqtt, to finish start the module.

Once started and the installation complete, by this I mean plugged into the EDF meter, the tic frames will go up in mosquitto. You can also see the log info in the info tab of the module and see how well everything is working.

Raise Power in the Dashboard Home assistant
It is easy to report the total power in the Lovelace dashboard in the form of gauges. Adds a gauge card or gauge in English and adds the PAPP teleinfo entity. I have a 12Kv subscription so I made according to my subscription to calibrate the power of the gauge.

Do not hesitate to modify the levels according to your electricity subscription.
type: gauge
name: Volt
min: 0
max: 12000
severity:
   green: 0
   yellow: 6000
   red: 9000
entity: sensor.teleinfo_XXXXXXXXXXXX_papp
needle: true
Here is the final result, I find the visual neat and clear.

Energy tab settings
Continue and click on the link below then on [Network consumption > add network consumption]
You should see two lines appear, one for off-peak hour HCHC and one for peak hour HCHP, add both.

If you already use the energy tab click instead on this link to configure the energy in HA.
Finally, after about 1 to 2 hours, admire the bargraphs and check the consumption

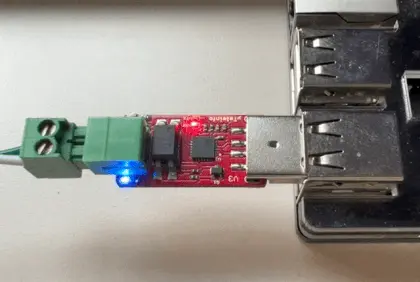
Let’s talk about the Micro Téléinfo v3.0 module (uteleinfo)
I ordered it on the tindie platform and received it 3 days later by green letter la post, thank you for this speed, I ordered the final version 3 fully assembled, and delivered I got it for 21€.

Sizes:
L 55mm x l 14mm x P 1mm
What are the changes in v3
- R3 replaced by trimer pot to allow adjustment of TIC sensitivity in rare cases
- Separate LEDs for RX / TX
- Gold plated PCB
- Reduced PCB size
- LED added so see TIC Teleinfo signal
- Added red/green TX/RX LEDs
- TIC resistor input set to 220 Ohms
- MOSFET resistor 3.3 KOhms
- Due to a shortage, change of the FT230XS chip to CH9106
Must say that v3.0 of µtéléinfo illuminates, you will not be able to miss the data transfer.
maybe a bit too bright for my taste.
Conclusion
Here is an example of an installation that is easy to set up to read the teleinfo on the linky or any other edf meter on the market. Charles Hallard has created an inexpensive, small and efficient module. As far as integration is concerned, we tend to use the transfer of info by mqtt frequently, especially if you use Zigbee2mqtt so I find the téléinfo2mqtt alternative practical to set up and relatively well done. There are all kinds of teleinfo integrations here in one, connected to the usb port.
So have fun.

Articles that might interest you

Dahua SD1A404DB-GNY the full option PTZ camera in Frigate
Following my Reolink Trackmix Poe camera test, I mentioned having found my ideal camera with a Dahua model. Well, here we are! Let me introduce the Dahua SD1A404DB-GNY, a compact...

SMLIGHT SMHUB NANO Review: The fully independent Linux smart home hub
After testing the SLZB-MR4U multi-radio dongle, I’m turning back to the SMLIGHT brand for a radically different yet equally exciting product: the SMHUB NANO MG24.

OpenWrt tutorials, AP bridge mode, guest access, and network protection
I wanted to write a summary tutorial because I encountered several problems while setting up my secondary router, which runs OpenWrt. I finally found all the information in the official...
Comments