Chamberlain RPD shutter motor
By Chamberlain
Chamberlain mechanical and wired shutter motor available in 10, 15, 25 and 40NM top quality price

This page has been visited ... times
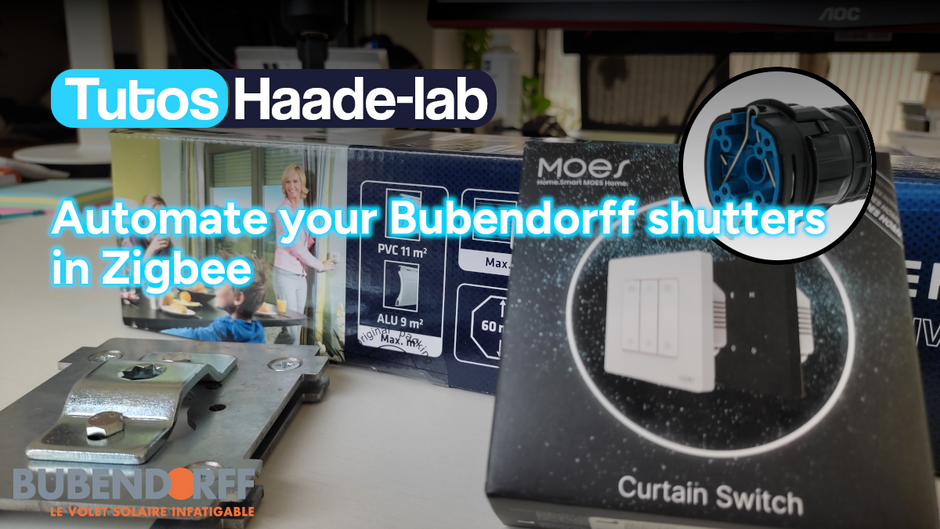
Today I’m not explaining to you how I automated Bubendorff shutters in Zigbee, simply because it’s not possible, but why I decided to remove the Bubendorff Tradi ID 1 system which was 20 years old by Chamberlain wired motors with mechanical limit switch connected to a Zigbee Moes switch.
Here is my house is 20 years old and the shutters installed at the time were of the Bubendorff brand Tradi ID 1 in a Titan tunnel rolling box.
These shutters and especially the motors have aged badly
After 10 years the motor capacitors were already starting to weaken, which resulted in a malfunction on the automatic stop limit switches. In addition to these increasingly approximate stops, this malfunction broke the upper bearing and accentuated the noise at the lower end of the stroke, which weighed on the entire mechanism.
Even after having changed these capacitors myself, the problem reappeared after a few years.
Haade.fr is a participant in the Amazon Services LLC Associates Program, an affiliate advertising program designed to provide a means to earn fees by linking to Amazon.com and affiliated sites.
The second negative point is at the level of noise, over the years the motors have become very noisy so on the one hand it is due to wear but also to the level of the titan box which, it must be said, are not very well soundproofed.
Now it is time to change them, two options are available to me.
1st option replace the tradi id 1 with tradi id 2 (radio or wired).
2nd option change brand and install new motors (radio or wired) with a Bubendorff Tradi ID adapter.
The motor currently in place is a 20 Nm, which seems a little limited to me given the size of the shutter (9m2 aluminum).
A motor Bubendorff R ID2 radio with titan box adapter and remote control in 25Nm currently costs more than 270€
Advantage:
Disadvantage
A Mi2 wired motor (without remote control and without adapter) currently costs more than €220 and you will still have to add the Bubendorff adapter and home automation options.
Advantage
Disadvantage:
This motor is delivered without a wired inverter. It is compatible with:
This wired motor is a 4-wire motor, therefore, if you have an old generation 3-wire motor, you will need to run a 4th wire from the motor to the circuit breaker.
I will not go for this option because the price puts me off, you will understand by reading this article, Bubendorff disappointed me quite a bit.
Start with another brand and take an adapter so what to choose?
First of all I will no longer take automatic limit switches simply because the capacitors age badly, and it creates malfunctions, whatever the brand.
So I will go for manual limit switches in short the old way.
For the brand I decided to go for Chamberlain shutter motors, so why Chamberlain:
And thirdly not long ago I changed the garage door motor with a Chamberlain motor, the motor is very good, does the job and the adaptation was super simple.
These are motors of simple design and can be automated in Zigbee you understand I will go for this option

So I’m going to give you a summary of the chosen material and the overall cost of this installation.
Let’s start with the engine, I went with a Chamberlain RPD25-05/10, price 100€ on amazon, you will find the RPD25-10 on manomano at 81€ ttc.
Then I need a universal mounting adapter I went with the one from the shutter store price 27€
Finally, I need a Zigbee switch and as I already have Moes Star Ring switches on Zigbee Tuya chip, so I naturally went for the same ones for roller shutters price 25€ max on Aliexpress.
Total cost for an installation of a wired Chamberlain shutter in Zigbee 143€ (I added 10€ for delivery for the shutter shop)
we are far from the 270€ for a single Bubendorff shutter
Personally I ordered a set to change 4 shutters, 2 in 25Nm and 2 in 15Nm, with 4 adapters and 4 switches, I had in all delivery included for 482€ at this price I would not have even been able to change 2 shutters of the Bubendorff brand, because 2 motors would have cost me 554€ and still not home automation in Home Assistant.

To begin with, the motors are German-made and of good quality, Chamberlain announces a 2-year warranty. You will find the instructions a little further down.
Feature:

The package is well made and the product well protected, in short I have not encountered any problems.

The chamberlain motor is delivered pre-wired length 2m50 with (neutral, phase, phase up and down as well as earth.)
Inside we find:
For the bubendorff adapter I chose the version sold by laboutiqueduvolet, This is a sturdy pre-assembled steel version that is perfectly suited to the Bubendorff Tradi ID cheeks. In order to fix the Chamberlain support I enlarged the holes because I used 8mm screws (not supplied with the kit), the original holes are 8mm

There is a mounting direction in the original Bubendorff cheek, the space for the cable passage must be located at the top left.
Moes is a Chinese brand including Zigbee chips from the Tuya brand, if you have read other articles on the site, you should know that it is not the brand of choice, however the Star Ring range from Moes is exceptional, the touch, the controls as well as the light of the LEDs are a success. I already have switches from the range, which is why I went for this product. Integration in Zigbee2mqtt is complete and the switches do the job.
Below are some screenshots of the product as a whole, nothing to say about the packaging and the switch.

The connection with the Chamberlain motor is very simple:

If you reversed the up and down phases it doesn’t matter you can reverse in the Zigbee interface
Before disassembling the hull, remember to pair the modules in your favorite assistant. Be careful, you will be working under voltage, remember to cut the power first.
Let’s start by fitting the center distance supplied with the shutter and the flat head screws

Next we move on to fixing the motor mount to the Bubendorff universal adapter
Be careful to orient the motor correctly in relation to the support in order to have access to the limit switch adjustment, do not forget to insert the safety pin

Before dismantling the bubendorf shutter do not forget to cut the power and disconnect the cable in the junction box. Our motor is powered by two wires (neutral and phase) which is very good for the rest and very simple.

Disassembling a Bubendorff shutter in a Titan box is child’s play, you will find several tutorials on this subject. First of all, turn the pin opposite the motor in order to be able to remove the axle. Then, using a small flat screwdriver, separate the motor support from the cheek by pressing the green lever on each side.

Once disassembled, to remove the motor, you will first need to drill the rivet that holds the motor in the Octo 60 tube. Using a mallet, you will easily remove the motor from the tube.
To resume, the original Bubendorff tradi id 1 motor is connected by two wires (neutral/phase), it couldn’t be simpler, the original flush-mounting boxes are all located at shutter height.

To make the connection between this box and the switch, I first drilled a 67mm hole for the switch at the same level as the upper box, then I bought an edma heating ball to pass through the wall between the two. This ball, once heated, burns the polystyrene and thanks to gravity it naturally follows a vertical path to the exit.
I use the original cable from the shutter to power the switch in addition to this cable you will need to connect a phase between the two flush-mounting boxes in 0.75mm or 1.5mm.
This way you will have everything you need to connect the assembly.

FYI the Bubendorff tube is slightly larger than 60mm so when mounting the Chamberlain engine it will be necessary to hold it in place with a screw or two.
I decided to use 2 domed head screws to secure the Chamberlain engine in the tube. There is no indication of the fixing in the instructions, but in the official assembly videos you can clearly see the engine being forced until you hear a click to fit the engine, as said for me there is a slight play which does not allow you to fit it firmly. But it does not matter, the axle at the end of the engine has a solid plastic part that allows you to insert a screw without breaking the system.
Personally I used two screws opposite each other.
When assembling the wheel on the motor side has a hollow part you must match it with the tube assembly molding see the photo below.
Finally, do not forget to orient the motor in the axis of the adapter in order to have easy access to the end of travel adjustment, as in the photo.

After cleaning the whole thing and greasing the tubing of the center distance opposite the engine, we are ready to put everything back in the traditional titan trunk. Don’t forget to pass the cable through the wall. Find the final assembly below.

the final result is very clean and suits me perfectly.
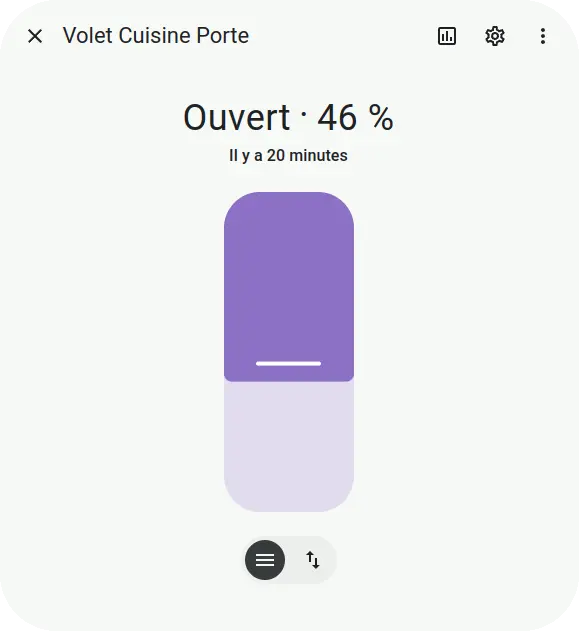
Thanks to Zigbee2mqtt our shutter will be able to be controlled in most home automation assistants on the market. As you know I use Home Assistant.

The integration of the ZS-SR-EUC of Moes will allow you to:

Changing the **forward/backward position is useful if the **open/clause connection of the brown and black phases are reversed

The calibration of the shutters works well here is the manipulation to perform:
I noticed that once calibrated the Moes switch takes 2 seconds longer before stopping for the upper and lower end of travel. For motors with mechanical end of travel this does not bother.
You can finally have fun in Home Assistant and control the shutters remotely.
As you can imagine I am disappointed with the Bubendorff brand, even if they have managed to reinvent themselves especially in the home automation part, it is a brand far too expensive for a catastrophic result in the long term, it is so much easier to go for other brands and thus save money. Fully automating an electric shutter motor costs less than €150 for a power of 25Nm. At Bubendorff it will cost you €277 and at this price it is still not automated, you would have to add €150 more for all the shutters to be able to control them remotely, it is simply disgusting. Good assembly!
Following my Reolink Trackmix Poe camera test, I mentioned having found my ideal camera with a Dahua model. Well, here we are! Let me introduce the Dahua SD1A404DB-GNY, a compact...

After testing the SLZB-MR4U multi-radio dongle, I’m turning back to the SMLIGHT brand for a radically different yet equally exciting product: the SMHUB NANO MG24.

I wanted to write a summary tutorial because I encountered several problems while setting up my secondary router, which runs OpenWrt. I finally found all the information in the official...
Copyright © 2026 Haade 🎉 by Nicoxygen


Comments