JEEDOM - JEEDOM LUNA Z-WAVE+ 700 AND ZIGBEE 3.0 HOME AUTOMATION CONTROLLER
By Jeedom
JEEDOM LUNA is the new entry-level autonomous and multi-protocol home automation box integrating the Jeedom software.

This page has been visited ... times
After having wrote a complete article on Jeedom Luna which shows, that this box simply runs under Debian, Jeedom Luna n It’s nothing but a Dusun 210, it’s a relatively closed box that does not offer simple solutions to reinstall in the event of a system malfunction, you will no longer need to return the box to your distributor , this article fixes it. You will be able under Windows easily to resume all the installation of the Jeedom Luna without too much difficulty?

As a prerequisite, you will need to download the corresponding Debian image as well as the utility and driver to send the data to the Jeedom Luna
Update: Jeedom offers the image compatible with the Dusun on their own servers, at the time of writing the update the image update.img end date July 2023, download there at this address https://images.jeedom.com/luna/. The other Jeedom images (jeeboard, freebox, etc.) are available at this address https://images.jeedom.com/
With this image follow the windows utilities and firmware upgrade steps and the installation will be complete
To start download the image, the file is stored on Google drive. Debian image rev 1.1.7
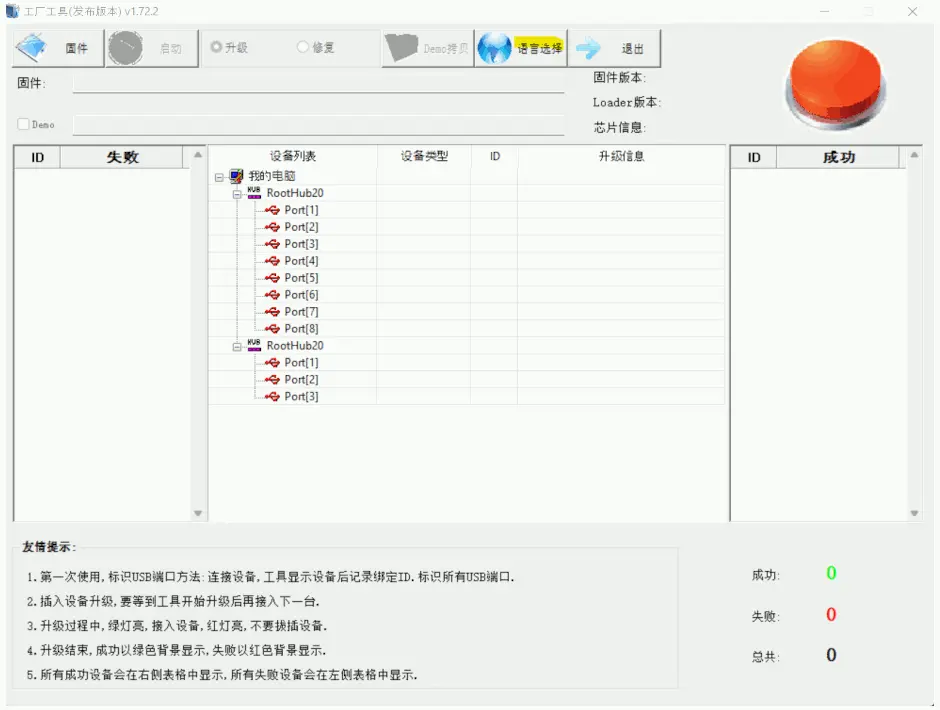
Here are two complete software that will allow you to transfer the firmware to Jeedom Luna, in this tutorial I use Factorytool
I find it practical but both software work.
Connect the Jeedom Luna to the PC using the usb cable provided and put it in MASKROM mode in order to be able to upgrade the firmware.
MASKROM mode:
Now a line appears in the list, select it
To finish click on Run
If everything went well you will have the indication in green
Then you can click briefly on reset and connect the jeedom luna to the mains and to the network in rj45 the circle will change from red to solid blue, debian has started
Below is a GIF animation showing the whole step:
find on your network the ip address of the Jeedom Luna
linux: open a terminal and type
ssh -p 22 your.address.ip -l root
Windows: connect in ssh with putty enter the ip, port 22 and username and pass.
FYI, there are two default user types on the debian image root and admin
ps: the password for the admin user is admin (*if you use admin you will have to put sudo in front of all the commands below)
Login with user root password: root
(*Optional) To comply with a traditional Jeedom installation, we will create a new user named jeedom and password Mjeedom96 then we will give administrator rights to this user
# at the password prompt enter: Mjeedom96
adduser jeedom

# give administrator rights
usermod -aG sudo jeedom
Now change user
su -l jeedom
start by changing the debian packages (the default packages are localized in china and too slow)
sudo nano /etc/apt/sources.list
delete all lines with Ctrl+k and paste the directories below, end with Ctrl+x then yes to save
deb http://deb.debian.org/debian bullseye main contrib non-free
deb-src http://deb.debian.org/debian bullseye main contrib non-free

deb http://deb.debian.org/debian-security/ bullseye-security main contrib non-free
deb-src http://deb.debian.org/debian-security/ bullseye-security main contrib non-free

deb http://deb.debian.org/debian bullseye-updates main contrib non-free
deb-src http://deb.debian.org/debian bullseye-updates main contrib non-free

deb http://deb.debian.org/debian bullseye-backports main contrib non-free
deb-src http://deb.debian.org/debian bullseye-backports main contrib non-free
sudo apt update && sudo apt upgrade -y && sudo apt autoremove -y
# resize
sudo resize2fs /dev/mmcblk2p7
# check the size
df -h
# you should find
# /dev/root 15G
This is the name of the default system, it will allow you to connect to jeedom without knowing the ip address, in our example which is the default of the jeedom luna we will call it jeedomluna so you can connect later on http://jeedomluna.local
sudo nano /etc/hostname
# replace Debian with jeedomluna and Ctrl+x yes
sudo nano /etc/hosts
# add under localhost the line and Ctrl+x yes
127.0.0.1 localhost
127.0.0.1 jeedomluna
saves new hostname
sudo hostnamectl set-hostname jeedomluna
# install dependencies
sudo apt install locales -y
# Set the locale
sudo locale-gen en_US.UTF-8 fr_FR.UTF-8
# Install languages
sudo dpkg-reconfigure locales
select en_US.UTF-8 and fr_FR.UTF-8 press enter and select by default fr_FR.UTF-8 click enter
sudo reboot
Normally in this tutorial you shouldn’t have to perform these two steps because the installation of all the packages should be done without problems. The first dpkg command is there to fix a failed .deb install, and apt –fix-broken install to repair any failed extension installs.
# flatten dpkg
sudo dpkg --configure -a
# fix broken files
sudo apt --fix-broken install
sudo apt autoremove
sudo apt clean
Now the Debian installation is ready to host Jeedom
sudo wget https://raw.githubusercontent.com/jeedom/core/master/install/install.sh
sudo chmod +x install.sh
sudo ./install.sh -w /var/www/html -z -m Jeedom
After 5-10 minutes Jeedom is installed
Remove unnecessary files from the root
ls
sudo rm -rf install.sh os-agent_1.2.2_linux_aarch64.deb
Finally Restart the Jeedom Luna
sudo reboot
All you have to do is connect to http://jeedomluna.local, and here you are on a fresh Jeedom installation compatible with Dusun 210
This is a manipulation that will delight more than one and carried out in less than 30 minutes. You hold in your hands the secret to resurrecting a Jeedom Luna? If you encounter a problem, don’t hesitate to let me know.

I wanted to write a summary tutorial because I encountered several problems while setting up my secondary router, which runs OpenWrt. I finally found all the information in the official...

Here’s an article that might interest many of you. For many years, Xiaomi has been developing a whole range of routers, each more powerful than the last, at increasingly competitive...
Even back then, outsourcing Home Assistant backups was a concern for me. Given my Raspberry Pi setup, everything was stored on the SD card, I wrote an article in 2023:...
Copyright © 2026 Haade 🎉 by Nicoxygen

Comments