
ZIGBEE CONNECTED SWITCH MICROMODULE - ZBMINI
By Sonoff
The SONOFF ZBMINI ZIGBEE switch micromodule offers the possibility of controlling a device/lighting in your home.

This page has been visited ... times
At the beginning I wanted to write a very simple article concerning the creation of an entity under home assistant which allowed to reverse an on/off switch command, particularly practical in the automation of electric radiators of a house. Then I I said to myself why not write a more complete article on the integration and complete automation of this type of radiator. The cost of such an installation will come back to you between 20 and 30€ per radiator depending on the modules used.
That’s why I’m going to detail the how to do it for:
You will have to work in the vicinity of a voltage of 220V which is dangerous if you come into contact with an electrical conductor. Be careful of your manipulations, if in doubt cut off the power supply.
If the module is far enough from the zigbee router, I advise you to pair it close to it before installing it behind the radiator
Connect the AC 230V wires to the input terminals (L-IN for phase and N for neutral), and connect the pilot wire diode to the L-OUT output. Two directions are possible depending on the order you want to obtain.

| Electrical signal | Pilot wire order sent to heating |
| No signal / No power | Comfort The radiator thermostat setpoint is followed |
| Negative half-wave | Freeze (White module side) The temperature remains above a certain threshold to prevent the water from freezing in the pipes |
| Positive half-wave | Stop (Red on the module side) The heating switches off completely |
Personally I wanted to use the Comfort/Stop command so I used the connection of the first diagram.
Once the installation is done, all you have to do is integrate it into home Assistant. (I integrated it in Zigbee2mqtt), to do this you just have to activate the inclusion mode in Z2M and then mount the heatsink circuit breaker in order to turn it on. During the first use, the ZBmini module automatically enters pairing mode.
The ZBmini module returns a simple on/off command in data

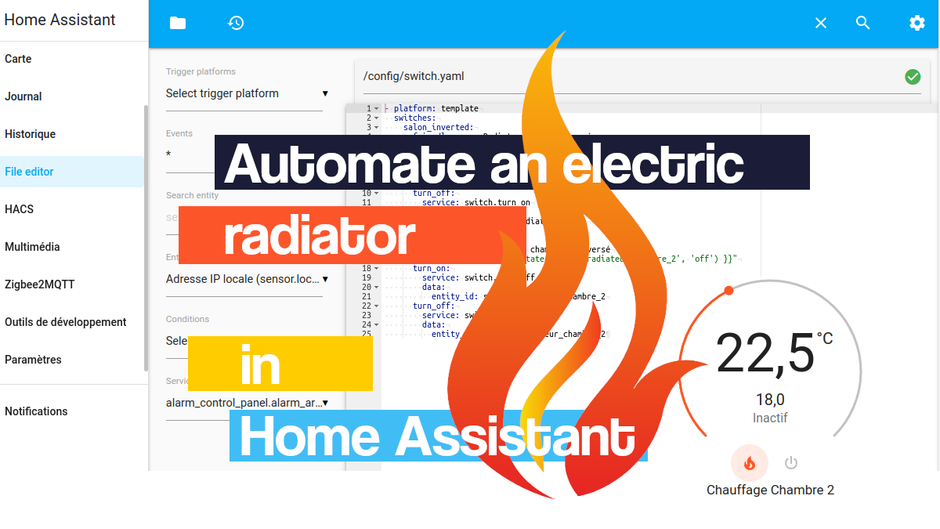
Why reverse the on/off command in Home assistant to automate an electric heater.
Quite simply because in the event of a power failure, the pilot wire sends the comfort command to the radiator. Which means the heater will be ON when the zbmini is OFF. As I wanted to include the generic thermostat command in Lovelace and for consistency I had to reverse the ZBmini command. more precisely I wanted to make the generic thermostat believe that by switching on the off command of the ZBmini it was switching on the radiator.
to reverse the command I first created a file switch.yaml, in this file I would put all the reversed commands of each radiator of the building.
start by putting this line in the configuration.yaml file and reload the configuration.
switch: !include switch.yamlThen create a switch.yaml file at the root of the ha files. And create a template like this:
- platform: template
  switches:
    salon_inverted:
      friendly_name: Radiateur salon inversé
      value_template: "{{ is_state('switch.radiateur_salon', 'off') }}"
      turn_on:
        service: switch.turn_off
        data:
          entity_id: switch.radiateur_salon
      turn_off:
        service: switch.turn_on
        data:
          entity_id: switch.radiateur_salon
this template will create a switch.salon_inverted entity named Inverted Salon Radiator. Modify according to your entities, the name of the zbmini entity, in my case: switch.radiateur_salon.
To be able to use the generic thermostat card, you need a thermostat that is in the same room as your radiator. For this tutorial I used an Orvibo battery-powered thermostat that I integrated into Zigbee2mqtt.
Below is a capture of the exposed commands of the Orvibo thermostat in Z2M:

Note the name of the temperature entities for the rest of the tutorial, for me: sensor.thermostat_salon_cuisine_temperature.
for this chapter I was entirely inspired by the article written by Zigomato
start by putting in ha’s configuration.yaml file this line:
climate: !include_dir_merge_list climate/Then reload the configuration and at the root of the files of home assistant creates:
and paste the code below
- platform: generic_thermostat
  # Name of our thermostat
  name: Kitchen and Living Room Heater
  # inverted command heating entity
  heater: switch.salon_inverted
  # temperature sensor entity
  target_sensor: sensor.thermostat_salon_kitchen_temperature
  # the minimum adjustable temperature of the thermostat
  min_temp: 16
  # the maximum adjustable temperature of the thermostat
  max_temp: 21
  # operating mode of the "heater" system
  ac_mode: false
  # the target temperature
  target_temp: 18
  # this is the low temperature tolerance for the heater activation
  cold_tolerance: 1
  # temperature tolerance before the heater is activated
  hot_tolerance: 0.3
  # this is the mode in which the thermostat first starts
  initial_hvac_mode: "off"
  # temperature in case of absent mode
  away_temp: 12
  # This is the precision for the temperature setting
  accuracy: 0.5
  # the minimum time of an operating cycle
  min_cycle_duration:
    second: 5
  # maintains heating for at least 3 minutes if the thermostat does not receive a command
  keep_alive:
    minutes: 3
Customize it according to your needs, it is commented to make your task easier. Here you have a lot of modifying the files in ha I ** suggest a restart of the whole **.
Last step create a thermostat map in Lovelace. Nothing could be simpler, go to Lovelace and select the thermostat card, and select the entity created in my case “Kitchen and Living Room Heating”

Here is a ** complete tutorial ** on the integration of an electric heater in home assistant. It will allow you to control quite easily the Stop and Comfort order of the radiator, to correctly trace the information thanks to the inverted command and to control the whole with a generic_thermostat card in Lovelace.
The automation of heating in a house is very important, it will allow you to make significant energy savings.

I’ve been looking for a compact and silent multi-channel controller to drive my 24V DC irrigation system for quite some time. After testing Zigbee solutions like the Sonoff SWV or...


Following my Reolink Trackmix Poe camera test, I mentioned having found my ideal camera with a Dahua model. Well, here we are! Let me introduce the Dahua SD1A404DB-GNY, a compact...
After testing the SLZB-MR4U multi-radio dongle, I’m turning back to the SMLIGHT brand for a radically different yet equally exciting product: the SMHUB NANO MG24.
Copyright © 2026 Haade 🎉 by Nicoxygen


Comments