wemos mini D1 pro esp module with antenna
By Estardyn
Renowned esp8266 development module wemos D1 mini pro with antenna to best capture wifi waves

This page has been visited ... times
Recently version 2022.11 of Homeassistant supports the water energy meter, it is possible to recover the data easily using esp and that for around 10€. In my case the meter is equipped with a 433Mhz Itron Everblu Cyble 2.1 transmitter. This makes it easy to retrieve data using a CC1101 receiver coupled to an esp8266/esp32. I picked up and modified a complete repository on github that was edited by psykokwak, and I commend his work. This repository allows data to be received and transferred by mqtt to homeassistant.


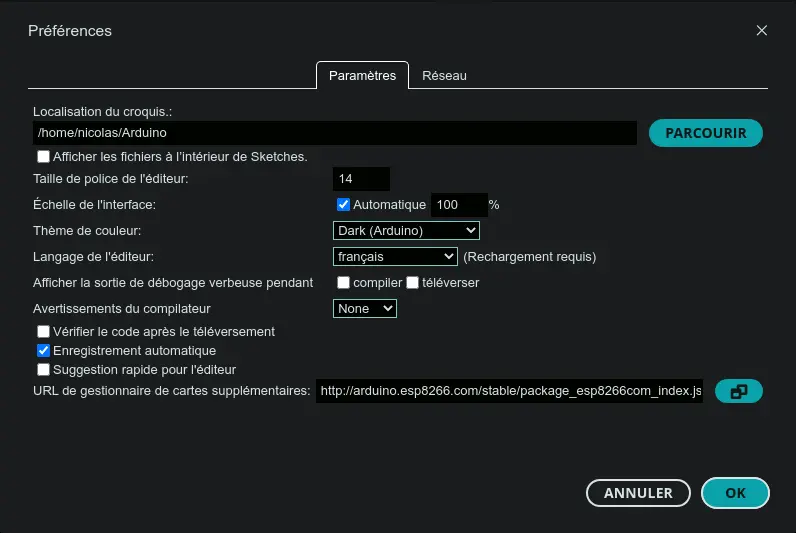
Let’s start by installing the esp8266 and esp32 card management library:
Card library esp8266 Card library esp32


sudo usermod -a -G dialout #USER
sudo chmod a+rw /dev/ttyUSB0
Method 1: Download the git, extract it and drag it to the sketch folder on the Arduino interface, otherwise drop the folder directly at the root of the Arduino folder.
Method 2: Command line
cd /home/nicolas/Arduino // go to your arduino folder
git clone https://github.com/haade-administrator/watermeter2mqtt.git watermeter2mqtt
| CC1101 | Wemos D1 mini | NodeMCU | ESP32 |
|---|---|---|---|
| VCC | 3v3 | 3v3 | 3v3 |
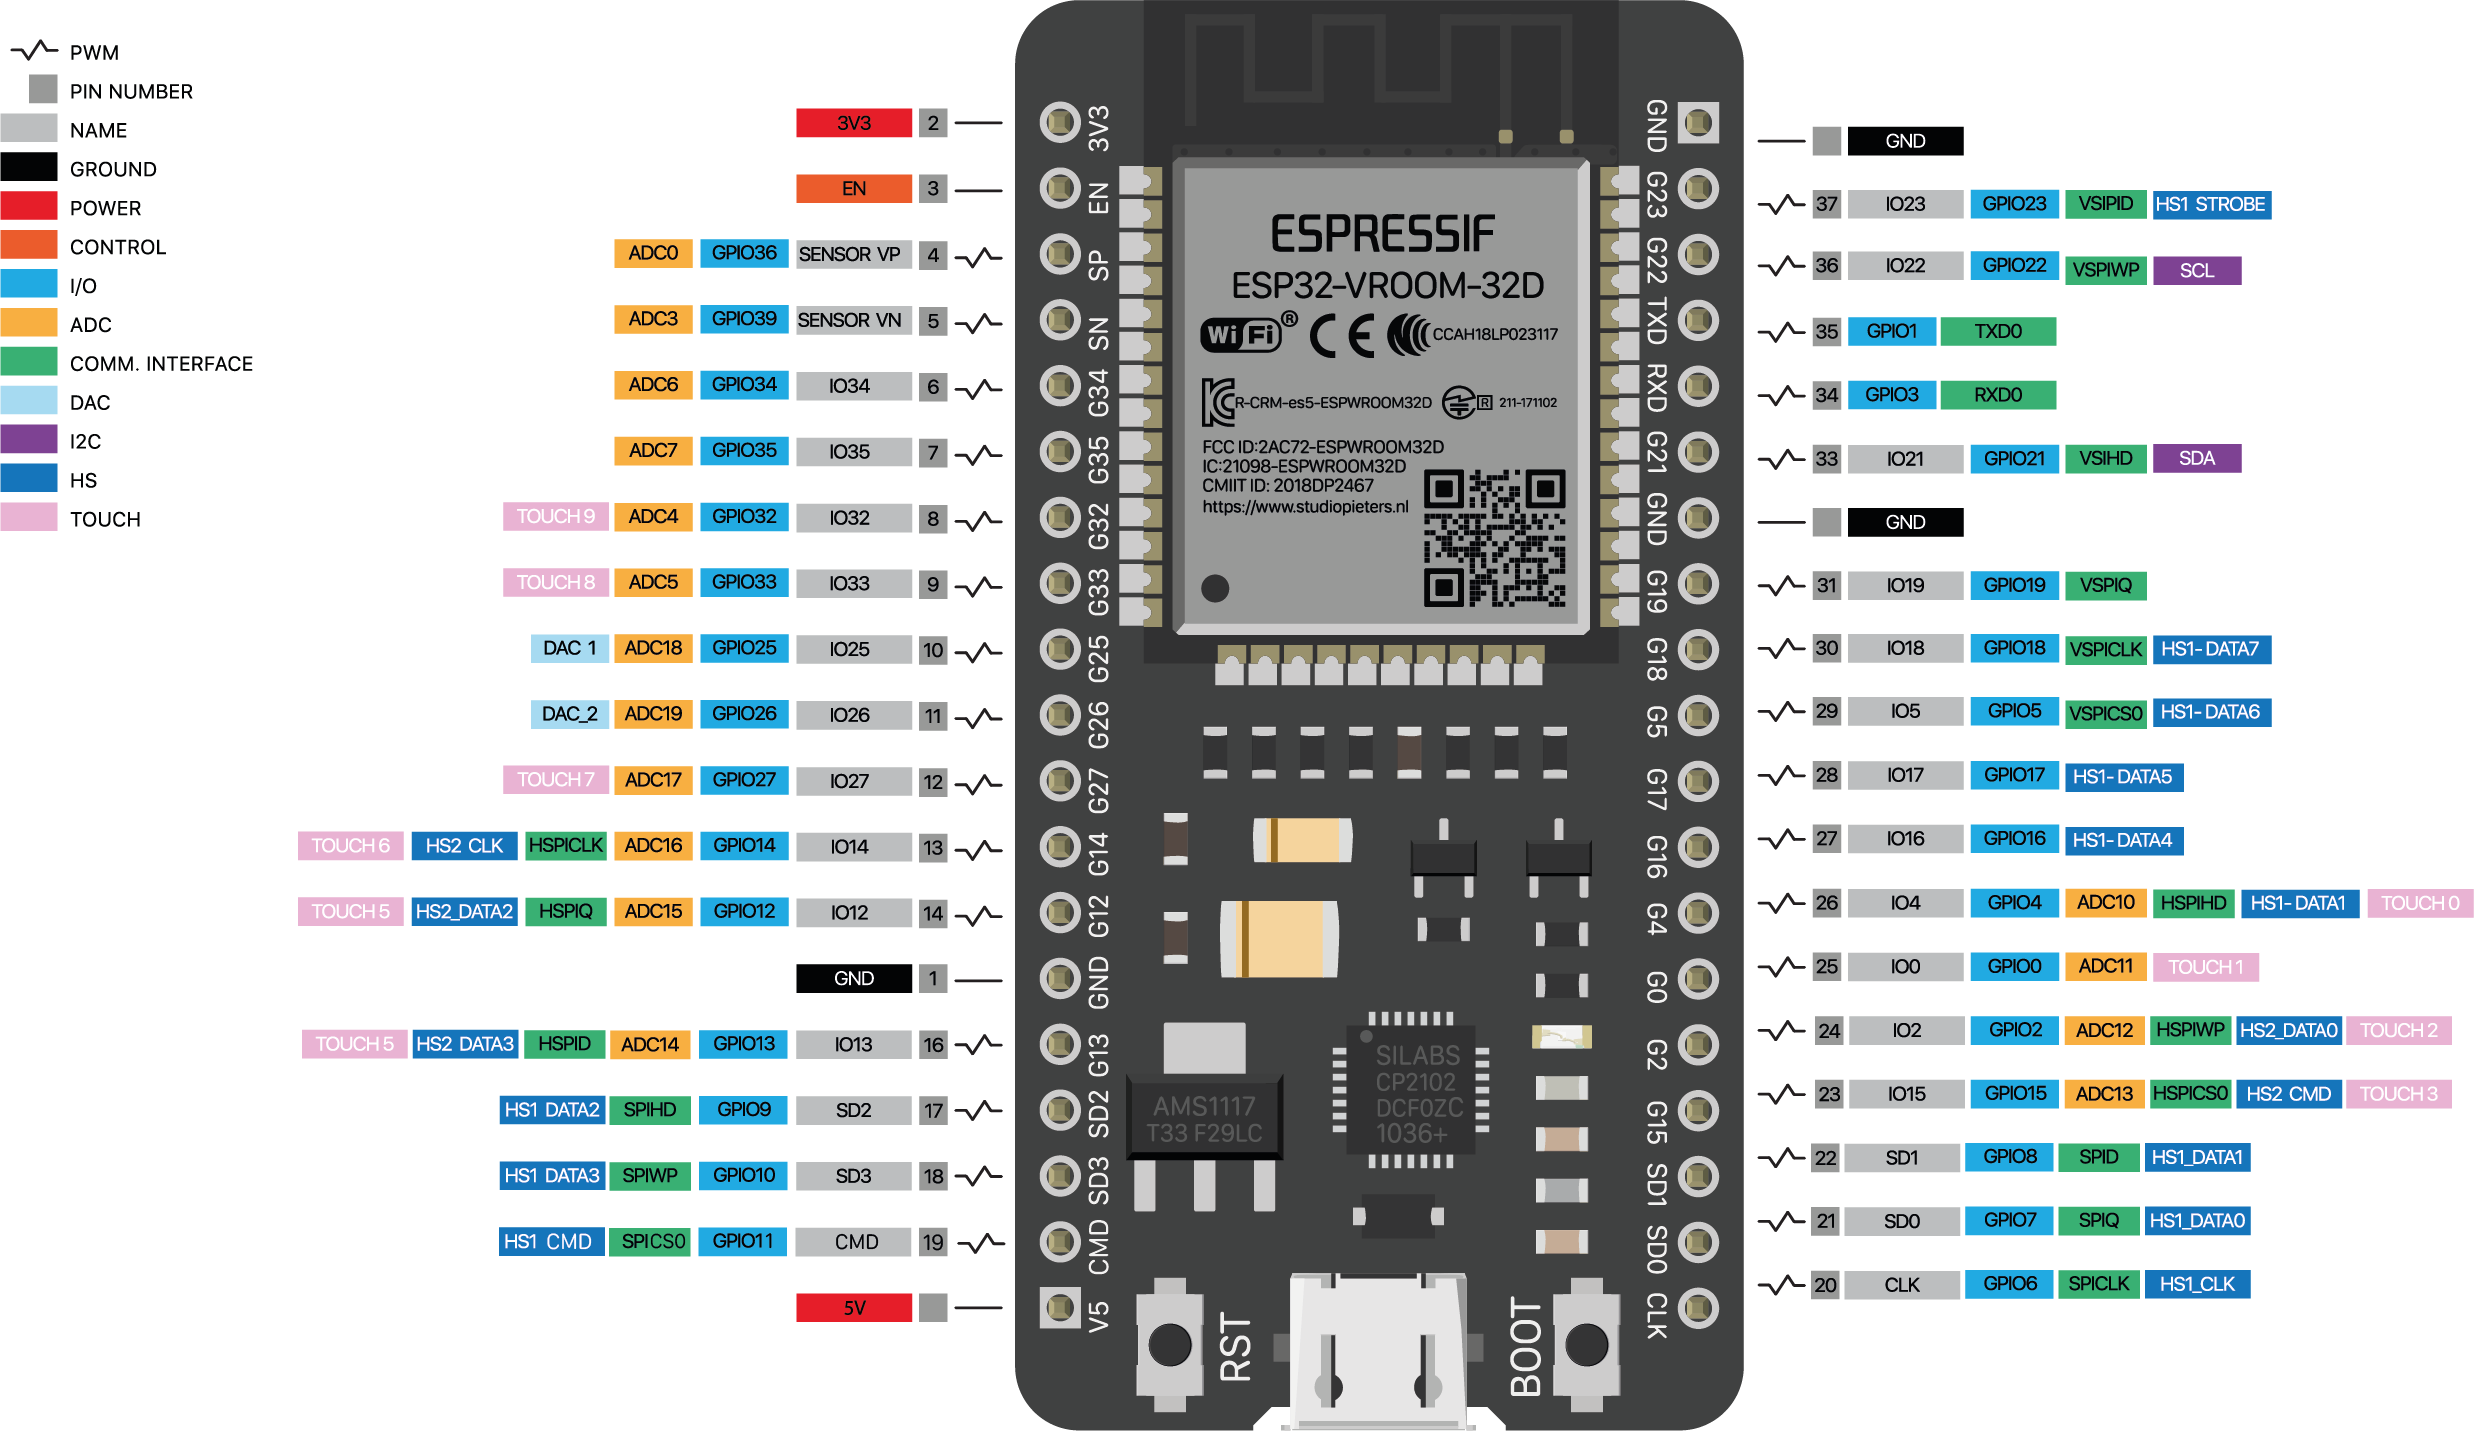
| GOD0 (GDO0) | D1, GPIO 5 | GPIO 5 | GPIO 22 |
| CSN (SPI chip select CS or SS) | D8, GPIO 15 | GPIO 15 | GPIO 5 ou GPIO 15 |
| SCK (SPI clock) | D5, GPIO 14 | GPIO 14 | GPIO 18 ou GPIO 14 |
| MOSI (SPI MOSI) | D7, GPIO 13 | GPIO 13 | GPIO 23 ou GPIO 13 |
| GOD1 (SPI MISO) | D6, GPIO 12 | GPIO 12 | GPIO 19 ou GPIO 12 |
| GOD2 (GDO2) | D2, GPIO 4 | GPIO 4 | GPIO 21 |
| GND (ground) | G | GND | GND |

1 wifi and mqtt settings
EspMQTTClient mqtt(
  "MyESSID",            // Your Wifi SSID
  "MyWiFiKey",          // Your WiFi key
  "mqtt.server.com",    // MQTT Broker server ip
  "MQTTUsername",       // Can be omitted if not needed
  "MQTTPassword",       // Can be omitted if not needed
  "watermetter2mqtt",      // Client name that uniquely identify your device
  1883                  // MQTT Broker server port
);
2 line 88-90 reading adjustment
As a reminder, this code collects consumption data once a day during meter reader working hours. ** Below I have set 2 p.m. UTC which corresponds to 3 p.m. France **
// At 14:00 UTC
  if (ptm->tm_hour == 14 && ptm->tm_min == 0 && ptm->tm_sec == 0)
3 choices of scheduled reading or at each data update
By default the script updates as soon as the data changes, just uncomment onScheduled line 257 to 259 and comment onUpdateData
// Note: on scheduled allows you to read the information once a day, onUpdateData allows you to read each time information changes
// onScheduled();
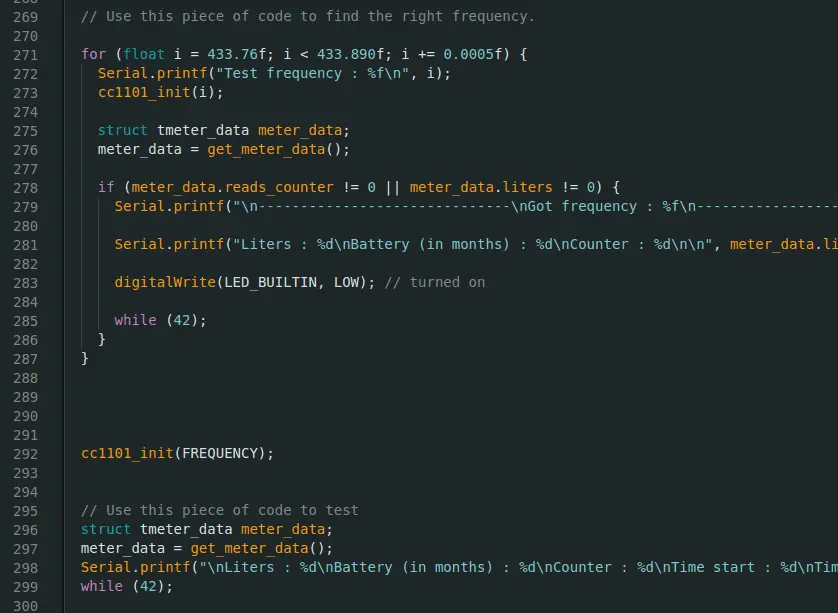
onUpdateData();4 find the right frequency for your CC1101 transmitter
Just uncomment the code line 272-291
// Use this piece of code to find the right frequency.
  /*
  for (float i = 433.76f; i < 433.890f; i += 0.0005f) {
    Serial.printf("Test frequency : %f\n", i);
    cc1101_init(i);

    struct tmeter_data meter_data;
    meter_data = get_meter_data();

    if (meter_data.reads_counter != 0 || meter_data.liters != 0) {
      Serial.printf("\n------------------------------\nGot frequency : %f\n------------------------------\n", i);

      Serial.printf("Liters : %d\nBattery (in months) : %d\nCounter : %d\n\n", meter_data.liters, meter_data.battery_left, meter_data.reads_counter);

      digitalWrite(LED_BUILTIN, LOW); // turned on

      while (42);
    }
  }
  */


  cc1101_init(FREQUENCY);

  /*
  // Use this piece of code to test
  struct tmeter_data meter_data;
  meter_data = get_meter_data();
  Serial.printf("\nLiters : %d\nBattery (in months) : %d\nCounter : %d\nTime start : %d\nTime end : %d\n\n", meter_data.liters, meter_data.battery_left, meter_data.reads_counter, meter_data.time_start, meter_data.time_end);
  while (42);
  */
}
Push the code to your module then select Serial Monitor:

the result should look like the image below:

Once the code has been retrieved, remember to comment on these codes, otherwise you will not be able to upload the data later.
5 Set the clock to your region (Optional)
Go to line 188-190 if necessary
configTzTime("CET-1CEST-2,M3.5.0/02:00:00,M10.5.0/03:00:00", "pool.ntp.org");The clock is set to Paris, to modify according to your region copy/paste the code available on this site
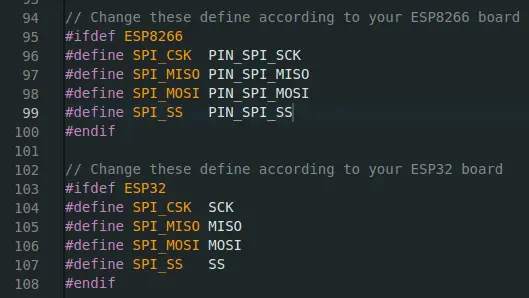
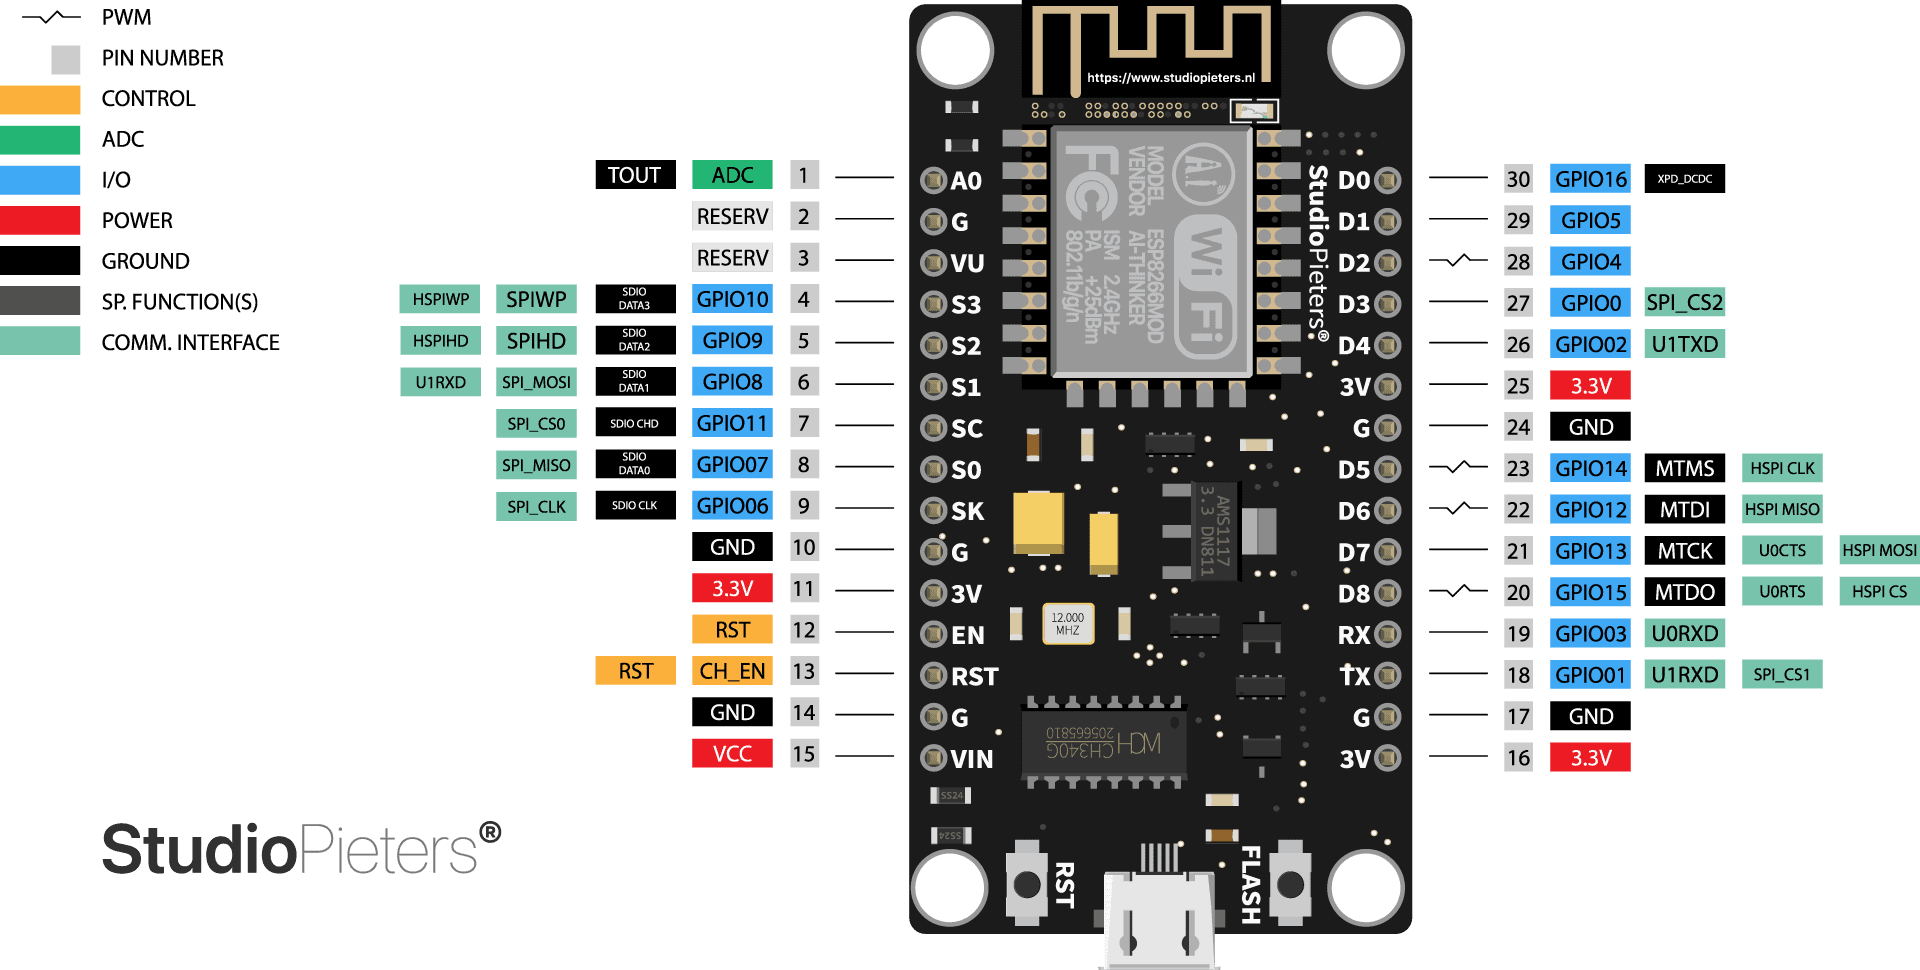
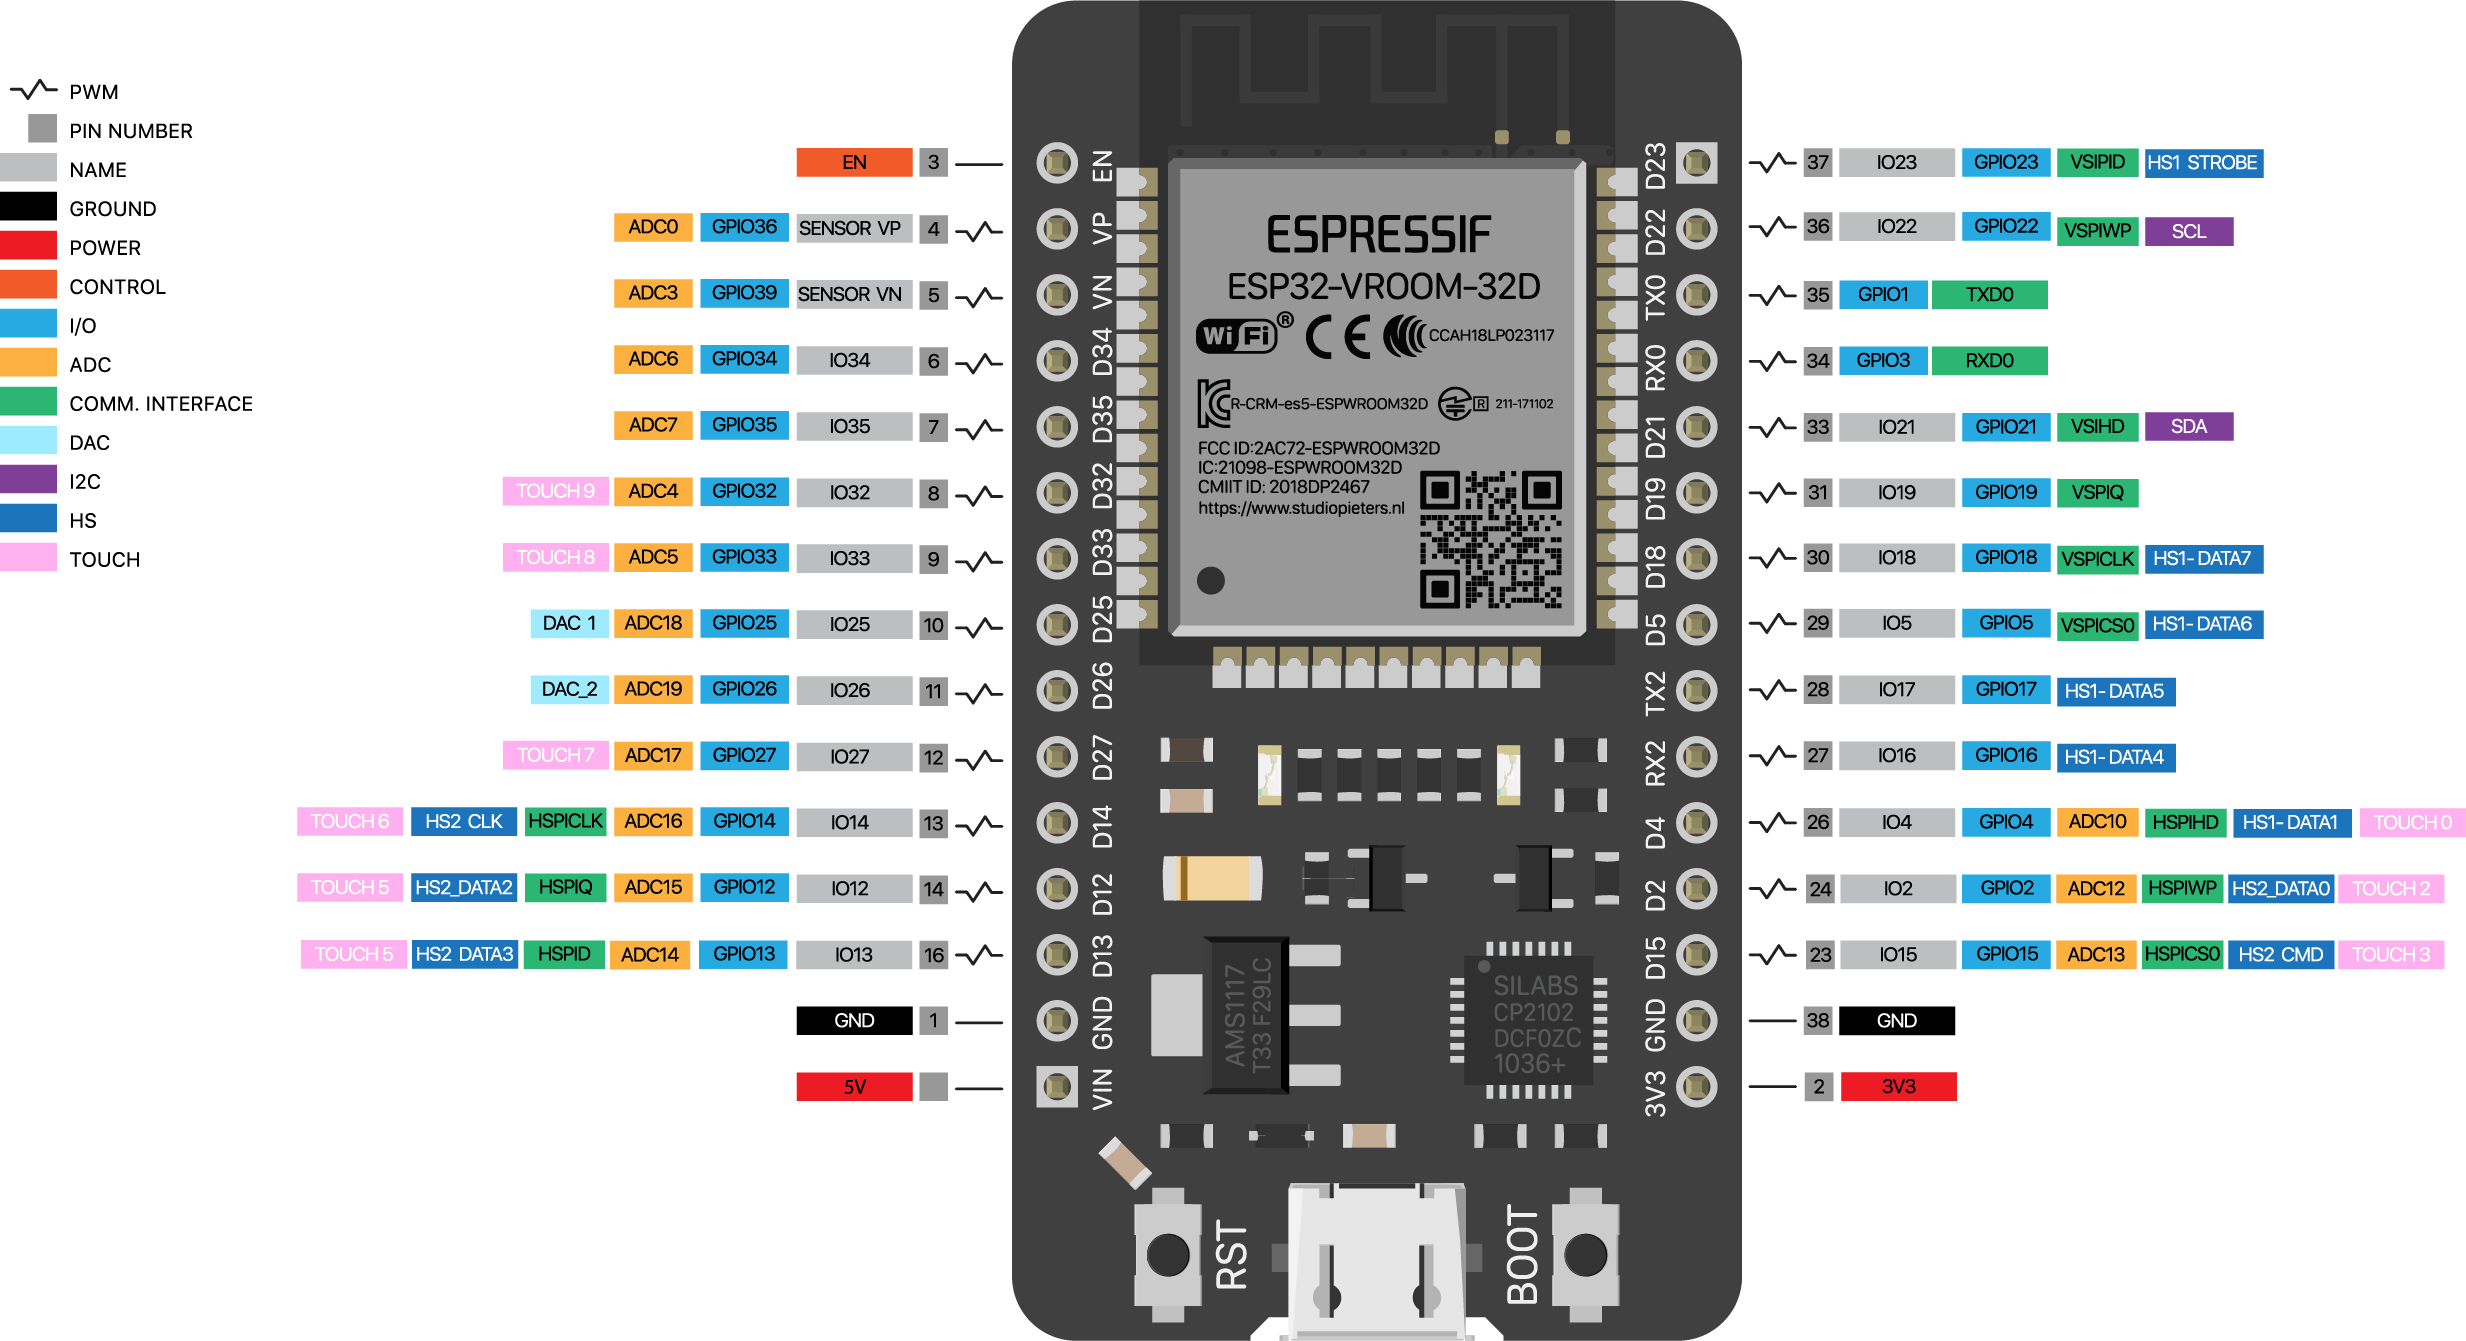
Important step, match the connections of the CC1001 to the GPIO of the esp module:
Let’s start by going back to the diagram available above, you will be able to realize that on a Wemos D1 for example that SCK corresponds to the GPIO14, Miso 12 etc… knowing that modifies lines 94 to 100 of the code available in this file. See the animated GIF below:
Code available on your itron module remember not to use the first 0.

at the very bottom of the file line 53-60
// Change these define according to your hardware

#define FREQUENCY 433.8683f  // frequency found above keep 4 digits after the dot and add f

#define GDO0 5 // gpio 5 on GDO0

#define METER_YEAR              15 // meter year
#define METER_SERIAL 886451 // Serial code without the 0All that remains is to validate the sketch project > check/compile or Ctrl+R, and if everything went well you should have the result
Executable segment sizes:
ICACHE : 32768           - flash instruction cache
IROM   : 331192          - code in flash         (default or ICACHE_FLASH_ATTR)
IRAM   : 28877   / 32768 - code in IRAM          (IRAM_ATTR, ISRs...)
DATA   : 1620  )         - initialized variables (global, static) in RAM/HEAP
RODATA : 6680  ) / 81920 - constants             (global, static) in RAM/HEAP
BSS    : 26968 )         - zeroed variables      (global, static) in RAM/HEAP
Le croquis utilise 368369 octets (35%) de l'espace de stockage de programmes. Le maximum est de 1044464 octets.
Les variables globales utilisent 35268 octets (43%) de mémoire dynamique, ce qui laisse 46652 octets pour les variables locales. Le maximum est de 81920 octets.
Then click upload: sketch > upload or Ctrl+U
result:
Wrote 372528 bytes (266139 compressed) at 0x00000000 in 23.5 seconds (effective 126.9 kbit/s)...
Hash of data verified.

Leaving...
Hard resetting via RTS pin...
Check serial monitor

this repository allows to retrieve:
The device polls the counter once a day, every 24 hours, and retries every hour if the query fails. Your counter can be configured in such a way that it only listens to requests during the hours when the meter readers are working. This is to save the batteries of the modules. If you are unable to communicate with the meter, please try again during business hours (8:00 a.m. to 4:00 p.m.), Monday through Friday. As a general rule, try to set up your device only during business hours to avoid confusion.
Your transceiver module may not be calibrated correctly, please change the frequency a little lower or higher and try again. You can use RTL-SDR to measure the necessary offset. You can uncomment the part of the code in the watermeter2mqtt.ino (see above), file which analyzes all frequencies around the meter frequency to find the correct one.
This is a simple method to set up, for those who are not equipped with an Itron Everblu Enhanced transmitter, there is another method which consists of putting an inductive sensor directly on the meter and connect it to an esp8266, this method is a little more restrictive because it will be necessary to have a source of energy near this meter in order to be able to supply the esp and the sensor with 5V, the price of the whole also oscillates around 10€, an excellent article is available here pieterbrinkman.com

I’ve been looking for a compact and silent multi-channel controller to drive my 24V DC irrigation system for quite some time. After testing Zigbee solutions like the Sonoff SWV or...


Following my Reolink Trackmix Poe camera test, I mentioned having found my ideal camera with a Dahua model. Well, here we are! Let me introduce the Dahua SD1A404DB-GNY, a compact...
After testing the SLZB-MR4U multi-radio dongle, I’m turning back to the SMLIGHT brand for a radically different yet equally exciting product: the SMHUB NANO MG24.
Copyright © 2026 Haade 🎉 by Nicoxygen

Comments