Easily outsource your Home Assistant backup

This page has been visited ... times
Sommary
Even back then, outsourcing Home Assistant backups was a concern for me. Given my Raspberry Pi setup, everything was stored on the SD card, I wrote an article in 2023: How to outsource your backup with Syncthing(/fr/blog/simple-sauvegarde-externe-homeassistant-syncthing-plus-gestion-backup). This method still works, but Syncthing is still quite complex.
Let me explain: Haade offers a module that allows you to connect via a web address for free, and I also offer my entire network the option to back up their latest backups to an external server. I needed to install something simpler.
Between 2023 and today, a lot has changed, and Home Assistant has evolved considerably. Since backup management is entirely handled by the application. It is possible, among other things, to add network storage supporting SMB/NFS protocols, which is for use on an internal network, but with WireGuard management, it would be possible to export backups to an external server.

Rsync, an open-source utility, is used to copy or move directories, similar to mv or cp, but also provides comprehensive synchronization and remote transfer features (based on SSH). Therefore, it can also be used in more advanced ways to maintain a duplicate of a storage space, or to set up rudimentary remote backup systems.
All this with a single command line, making it easy to use.
To follow this tutorial, you’ll need some basic knowledge, but don’t worry, it’s nothing insurmountable!
Prerequisites
- Home Assistant OS
- A NAS with OpenMediaVault (preferably)
- File Editor add-on for Home Assistant
- Rsync add-on for Home Assistant
- Open port 22 on your router
- Have a static external IP address (preferably)
Installing Rsync in HAOS
Let’s not waste any time and start by adding the Poeschl repository to the module manager. Go to: Settings > Add-ons > Add-on Stores > Menu > Repositories

To add repositories, click directly on the link below or add them manually.

Direct link to the repository: https://github.com/Poeschl-HomeAssistant-Addons/repository and click Add.
Refresh the add-ons page, go to the Poeschl tab, and install Rsync.

Using and Configuring the Rsync Module
Once Rsync is installed, start it without changing the configuration. This will initially generate the SSH keys in the /ssh/rsync/id_rsa directory. We will retrieve these keys to connect to our NAS or remote server.

Now let’s move on to configuring the rsync module.

- Directory where SSH keys are stored
useris the rsync username must match the user in omv. I used Nicotest.- Local and remote folder configuration + options if necessary
- local: (This is the backup folder in HA by default: /backup)
- remote: This is the remote folder. For me, backups will be saved in /export/data/Backup/Nicotest
- Additional options during rsync transfers
- Direction: pull or push by default (push pushes data from HA to external sources)
- remote_host: IP/HTTP address of the external server.
In Conclusion: On the OMV side, I’m going to create a Nicotest user with their own home directory. Therefore, in rsync for Home Assistant, the user should be Nicotest, and the remote directory will ultimately be Nicotest**.
Retrieving the SSH Key
Now, we need to retrieve the SSH key, which is essential for the remote connection between the two systems. It’s quite simple; we’ll use the popular file editor module, available by default in the Home Assistant add-ons section.

If you haven’t installed it, click on the link below.

Next, to access the root directory in the file editor module, and yes, by default you only have access to the /config subfolder, remember we need to access the /ssl/rsync/id_pub.rsa subfolder.
So it’s very simple: go to the module’s configuration and uncheck Enforce Basepath. Then restart the module.

Now open the file editor interface and navigate to the file. Then simply press ctrl-c and you’re done! 👌

NAS Configuration
Heading to the NAS, I’m assuming you’re familiar with this wonderful content management software! Let’s go! Go to the Users tab > Settings and check the box for user home directories. This way, the user created Nicotest will have a directory in /export/data/Backup/Nicotest. You don’t have to create these directories automatically if you don’t want to, and you can create them automatically. However, don’t forget to recursively grant the corresponding permissions to the subfolders and files. To do this, follow the steps.
ssh -p 22 xxx.xxx.xxx.xxx -l root # SSH connection to the NAS
mkdir ../../Nicotest
chown -R Nicotest:users Nicotest
Let’s move on to the user creation step:
- Name: Nicotest
- Password
- Group: be sure to select _ssh
Then confirm and verify that your user has the correct permissions for _ssh and users

Now you need to copy the ssh key previously taken from Home Assistant.
Warning
When copying the key into Home Assistant, a line break is copied along with it. You will need to remove this line break in OMV for the key to be recognized correctly; otherwise, you will not be able to add it.

Now you can register the user.

That’s all you need to create on the OMV side; it’s simple, quick, and efficient. There’s no need to install the Rsync extension for OMV.
Check before launching
Let’s review the steps before the final launch of rsync for Home Assistant.
Home Assistant Backups
You must, of course, have backups in Home Assistant to verify that everything is working correctly. Yes, Home Assistant natively manages backups.
Go to Settings > System > Backups. If automatic backups are not configured, I strongly advise you to do so.

As you can see from my configuration above, I don’t have any automatic backups created. This is normal for a test installation, but I do have two backups configured.
Rsync in Home Assistant
We are now ready to run rsync a second time (as mentioned above, once the task is completed, Rsync stops; you will need to create an automation later).

Once the startup is complete, let’s check the logs

So let’s break down the command line
rsync --archive --recursive --compress --delete --prune-empty-dirs \
-e 'ssh -p 22 -i /ssl/rsync/id_rsa -oStrictHostKeyChecking=no' \
/backup
This command:
- Synchronizes /backup
- In full backup mode (permissions, dates, etc.)
- Via SSH with a private key
- With compression
- Deleting obsolete files on the destination side
- Cleaning up empty folders
- Without user interaction (ideal for a cron job)
Complete and efficient.
I connect to the NAS server via SSH and indeed everything is saved in a backup/ folder

The files have been successfully copied and verified on the OMV side
Creating a Home Assistant Automation
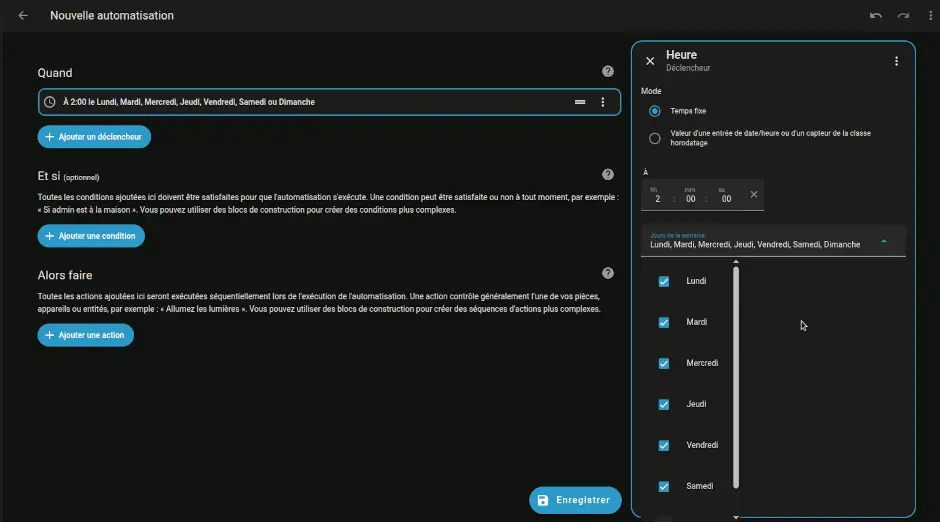
Now we’re going to create an automation that will run x times per day and start the rsync add-on.
I know it’s not very practical, but because automations have been simplified in the latest versions of Home Assistant, I decided to create an animated GIF anyway.
Conclusion
Rsync is a simple way to offload Home Assistant backups to a NAS, much lighter than Syncthing, preferably one equipped with OpenMediaVault. Thanks Poeschl, thanks OMV, security first. 🫵

Articles that might interest you

Dahua SD1A404DB-GNY the full option PTZ camera in Frigate
Following my Reolink Trackmix Poe camera test, I mentioned having found my ideal camera with a Dahua model. Well, here we are! Let me introduce the Dahua SD1A404DB-GNY, a compact...

SMLIGHT SMHUB NANO Review: The fully independent Linux smart home hub
After testing the SLZB-MR4U multi-radio dongle, I’m turning back to the SMLIGHT brand for a radically different yet equally exciting product: the SMHUB NANO MG24.

OpenWrt tutorials, AP bridge mode, guest access, and network protection
I wanted to write a summary tutorial because I encountered several problems while setting up my secondary router, which runs OpenWrt. I finally found all the information in the official...
Comments